Wednesday, February 24, 2010

Art/Craft Club - project: decoupage/collage

 
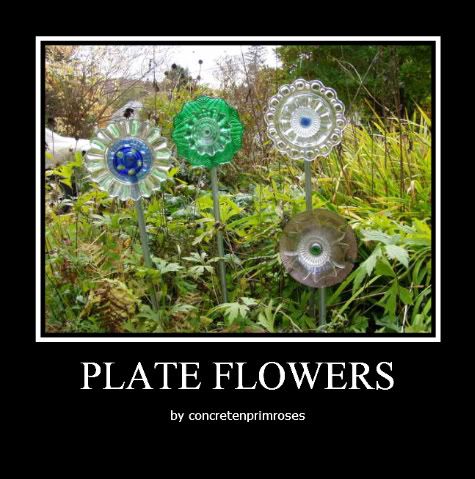
One of my neighbors and I decided to start an Art/Craft group. We already have an informal sometimes weekly meeting of women on our street and nearby and decided to piggy back on that meeting. We decided on this format: that each person can bring their own thing or do something supplied by the host or their helper Or just show up and talk and snack as usual. For our first one, Susan hosted and I supplied decoupage/collage supplies. I also brought samples and books. Here are some of my samples, my ancester candle holders and my "decoupage under glass" plate.
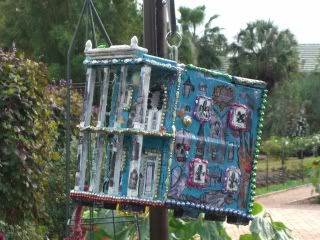
And next examples are a frame I made for a decoupage class that I taught at a group home (they all made similar but bigger ones), and a different view of the ancester candle holders:
Photobucket I need a new phone message book, so as a demonstration I took this plain notebook: Notebook - before and turned it into this using some paper that I brought. I layered papers and used partial prints along the edges and lots of mod podge: Photobucket
On the back I decided to go simple: Photobucket
It was fun! Everyone looked at my decoupage books and most of the 6 of us worked on crafts. Susan showed her gorgeous glass on glass project which unfortunately I didn't get a pic of and she cut up some paper to for paper collage/mosaic. The other Kathy cut out the middle of some pretty cards to use as frames for the table numbers at her daughter's wedding. Marion knitted. Heidi brought a box of patterns and started to teach Jen about sewing. Only Jen wanted to try paper collage on an extra notebook that I brought, but she didn't get very far and asked if I'd bring the supplies back next week to her house.
And I finished something. I have a beautiful new phone message book. Everyone said "you mean your husband actually takes messages?!" Well, that's another matter.

I'm linking to Whatever Wednesday at Someday Crafts. Check out the awesome projects and ideas here.

Also go to LIT AND LAUNDRY's Finished for Friday to see other finished projects!

Kathy

Posted by Picasa

Friday, February 12, 2010

Valentine infinity card for dh

 
Here is the infinity card that I made last night. My husband is going on a business trip on Saturday and he'll be gone for Valentine's Day, so I'm going to sneak it into his suitcase. I already trained him to open them properly by showing him my first attempt which I posted yesterday. I used scrapbook paper, and glued images on once I constructed the card. Here I added a butterfly to the front.
Then this is what you see
Photobucket
when you open the front by bringing the middle cut up and down. These represent things that my dh and I like to do, look for wild plants when we hike, go to the beach, garden.
Then you open those images like a cupboard door and you get this:
Photobucket (I'm going to add words, in some of the white spaces). Then you open up and down from the middle again and:
Photobucket
this is the back of the card, but when you open it like a cupboard door, you find yourself back at the beginning!
I made another by printing on the back of scrapbook paper, but I printed some of the images upside down by mistake. I figured out how to make a perfect template in paint shop pro while I was in the shower, but I've run out of time this morning.
Thanks for looking. Check out yesterdays post for the link to directions and a video on how to make these. Very very simple really.
Kathy

I'm linking to Lit and Laundry's Finished for Friday! Check out the other accomplishments there!

Posted by Picasa

Thursday, February 11, 2010

Vintage Thingies Thursday Plus Infinity Card!

 
This week I'm mixing a craft with my VTT post. Visit Coloradolady to see the other cool vintage things!
I found the blog, Paper Forest, yesterday when I was looking for more info about my Craftrobo cutter that I bought to cut vinyl letters for signs at work. (It can also cut intricate scherenschnitte-like designs in paper, which I posted about here.) Instead, I was totally enraptured by the "infinity card" video tutorial by illustrator Marilyn Scott Waters that I rushed to make my own card - not finishing reading the directions (typical me, I'm afraid). I missed the gift PDF to print MSW's card as shown in the video with instructions. Check it out!
Above is my not very beautiful attempt sitting on top of some pretty paper. I used vintage images that I have handy on my computer. This is the front of the card, and you can see that it is split across the middle.
To open, from the middle you open the top section up and the bottom section down, and you see these 2 parrots, photoed here with my Royal Baking Powder vintage tin:
Photobucket
Next, you open the parrots out to the side and you get this kind of boring look at these 4 decorative squares. I'll do better on the next card I make!
Photobucket
Then you open up and down from the middle and you just see the design printed on the backs, shown here with my Memere's white glass salt pepper and seasoning shakers that she always kept by her stove, Photobucket and finally you open that side to side and you are back at the beginning.
I think this concept would make an awesome valentine card if printed on the back of one or more of the pretty papers that I have pictured here with some salt and pepper shakers. I'm going to try to make some tonight and post tomorrow on Finished for Friday.
Photobucket
The salt and paper shakers say "Sterling - Weighted" on the bottom, and also "by Duchin". They are lined with glass, except not the shaker. I just found them going through some of my old kitchen stuff I had stored in the cellar! Does anyone have any suggestions for cleaning? Is it safe to pour salt through the unlined silver tops/shakers? Aren't they cute anyway?

Thanks for looking. Check back tommorow to see Valentine Infinity Cards!

Kathy
Posted by Picasa