Showing posts with label Crafts. Show all posts

Monday, September 26, 2016

Air Dry Clay reviews: DAS and Activa Plus Part 1 of 2

I bought both of these in 2.2 lb blocks after reading reviews and looking at what other crafts people recommended.  Disclaimer:  This is not a scientific study!  I didn't do the exact same thing with both clays, though close.

First I used the DAS, and I had a bowl of water with me to keep the clay moist.  I had read complaints that it was chunky and dry but that wasn't my experience. I did keep the clay covered and dampened it with water while i worked with it.  Then I put wax paper over it as it dried.   20 hours later, I could bend them slightly but they didn't take impressions anymore.  Its lucky they were still pliable because I realized I might want to add some beads to the bottom of a few of them so I made some holes with an small awl.  Three days after first making them they are hard and white, see below.  I didn't notice any shrinking.

DAS 3 days after making


Then the Activa Plus. I found this clay a little harder to work with, but easier to smooth.  If felt wetter than the Das, but seemed to dry quicker.  Again I put wax paper over the top so they wouldn't dry too quickly, especially the big mushroom which my dfd made.  I fiddled with the butterfly so long that I forgot to make a piece with impressions, so I'll do that later.  The next morning the small pieces that are the tips of the wings had curled up slightly and I cracked one trying to flatten it.  But I brushed on water on both and they seem to be ok.  There was significant shrinkage which I could see because the wax paper had crinkled up around the pieces as they dried and pulled the paper.  The shrinkage hasn't affected these pieces yet, and I'm hopeful that they will be ok.  I am still covering the big mushroom now (2 days later) because I'm afraid it will crack and want to slow down the drying process.  Picture below - two days after making. (I pushed the butterfly pieces back together now that they are somewhat dry. The cap of my mushroom is a separate piece.)

ACTIVA PLUS 2 days after making:


Quite a few days later I remembered to roll out some Activa to make a stamped piece.  By this time I knew it would shrink a lot, but this shows it pretty dramatically.  (Activa on left, DAS on right)  Same stamp used on both shows the shrinkage of the Activa.  It also didn't take the impression as well.

 Gnome house on a jar

I thought this would be a great test of the clays.   First I used the Activa but it cracked as it shrank.  (Even though I hadn't done the above primrose stamp, I should have known, right?... based on the butterfly)  I'm not sure this is a problem as I can put vines and flowers on top of the cracks, as long as the clay doesn't fall off, we'll see.  I put the cover/roof on for these pictures but I'm drying them separately.

Activa Plus gnome house, stage 1 after about 20 hours.  Cracks on the jar part, btw roof has tinfoil armature:


Then the DAS on a jar on the right.  I didn't want to make the exact same thing.  No problem with cracking.  Unfortunately I didn't take a picture of the top of the DAS one until it was all painted.
 Here you can see the Activa mushroom top all cracked, below.  And above left, the side of the door has fallen off.  I panicked and decided to fill all of the cracks with hot glue, which was a big mistake because hot glue doesn't take paint very well.  So I had to put clay over all the cracks. I made a big leaf out of DAS clay for the top and covered the cracks in the base with DAS clay and pressed leaves in It came out ok, but was very time consuming.

So don't use Activa over something.  It shrinks too much.  In a review that I read someone complained that DAS is "rubbery".  I think that is true but have decided that isn't such a bad thing when using a form or armature.

Here are the finished Gnome houses.  I haven't decided whether I want to put a shiny finish on them or not.  Each one is a working jar, by the way.


I like the Activa for making small objects.  Here are the mushrooms
 that my foster daughter and I made.  Mine is the red and white one.
I also like the way that Activa takes paint.  DAS is whiter, doesn't shrink much, and takes impressions well.  But it is rubbery and harder to smooth and doesn't take paint as well as the Activa.
Here are some of the things I made still in progress  (Below).  I'm going to make a butterfly with the DAS clay to compare to this one, but that will be my next post. And hopefully I'll have the butterflies both used in projects by then as well.


Bottom line, they both have their uses.  But if I could have only one, I would pick DAS because of the shrinkage issue with Activa.

Thanks for looking.  
Kathy


Sunday, December 13, 2015

Gingerbread creation

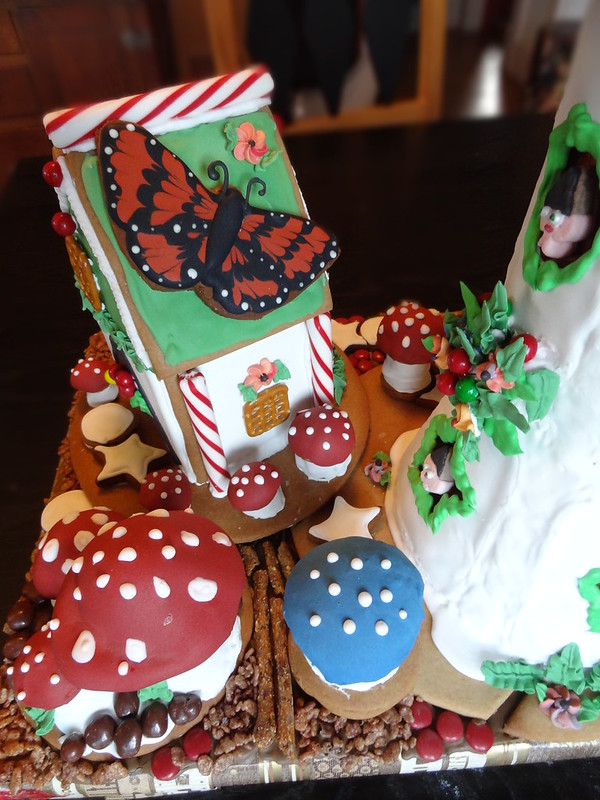
"Deep in the Forest"   I made this for The Family Place's 13th annual Gingerbread Festival.  There was a peoples' choice vote and I was third place (adult catagory).  The big blue mushroom is about 15 inches or so tall, and the scene is all edible except for the base it sits on.  These photos are the morning before the festival before I transported it over.


I'm totally hooked!  I'm already planning next year's creation.  My friend Linda made the flowers and leaves which we dried on wax paper then I put them where I needed them later.


I got tired of making caps and stems for the smaller mushrroms and thought I'd try forming mushrrom shapes whole and cooking them.  Of course they collapsed as they cooked,  but they turned out to be perfect for the roof mushrooms.   There are little elf faces made out of marshmallows in the windows of the mushroom stem and hiding in the shrubery behind the little house.


I tried too make even the back side pretty, and I put some candy way up high under the cap.


This is the first thing I've ever made from gingerbread and royal icing.  By the time I got to the butterfly, I'd finally gotten good at the icing!  

Ginger bread mushroom 2015


Thanks for looking!


Saturday, February 21, 2015

Vintage Pinecone Elves diy

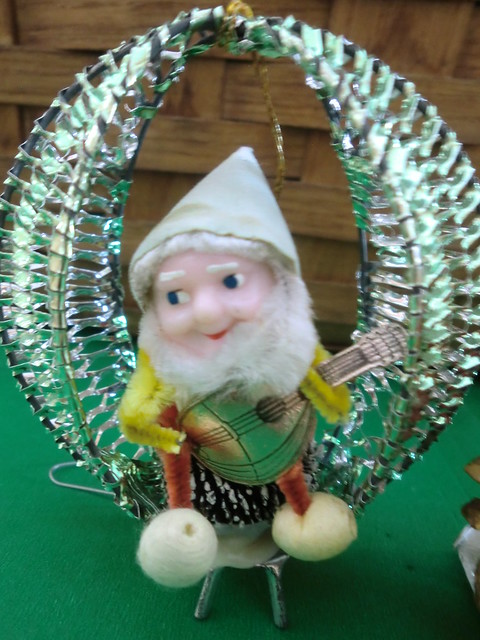
I know its not Christmas, but I run out of time and don't make Christmas crafts at Christmas!  I love vintage pinecone elves.  Here are some of the ones that I put out at Christmas.  The ones in the bowers were on our Christmas tree when I was a kid (I have 6 total).  The little girl skier was my mother-in-law's.

CIMG3358

Then there are these which are in bad condition but I still like them.   I think it would be nice to have a few dozen more so they could take over the Christmas tree.  A few years ago I gave my brother six in the bowers (like our childhood ones) that I bought on ebay.  Even as I was purchasing them the prices skyrocketed!

CIMG3360

So I've been saving supplies for years to make my own.  I would want to make them anyway, but the high prices of the "real thing" is another incentive.   Many people have made very nice modern versions.  BUT I love the faces on my vintage ones and want more like them.

CIMG3359

Love that face!  Some vintage ones have mean faces.  I prefer this face.
A couple weeks ago, I mentioned to a friend that I had all the supplies and have been wanting to make them for years.  She asked me to show her craft circle how and offered to come and help me figure it out a few days before.  So I was forced to do it!  The day before she came, I made some faces from sculpy and gathered all the materials together.  Unfortunately I didn't take pictures of what my friends made at the group.  I shared my supplies, including faces and sculpy mushrooms.

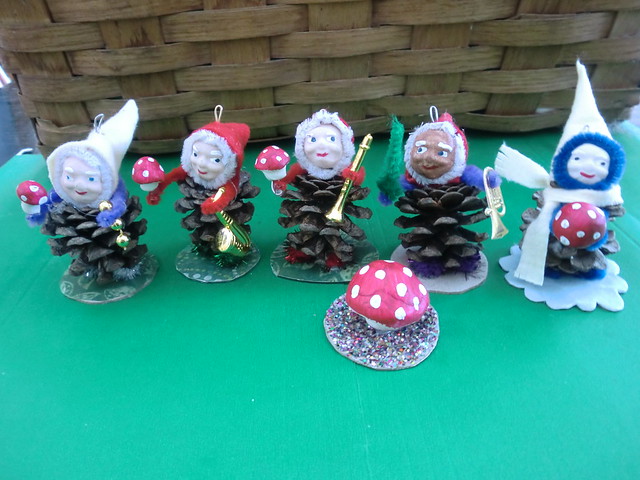
So here are the ones I made which are like the traditional ones...

CIMG3361

And a close up:

CIMG3361

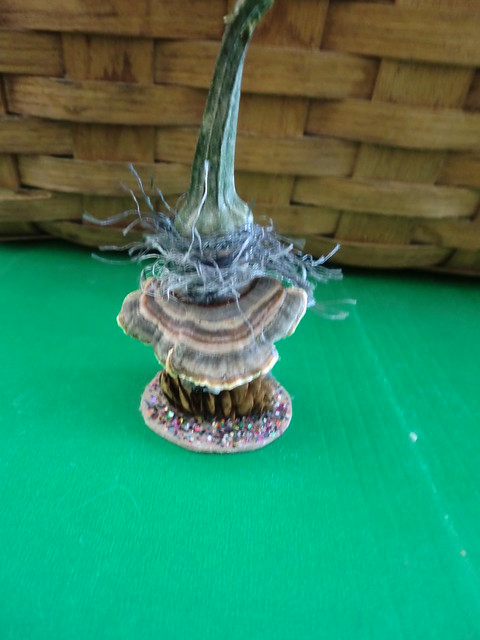
And here is my favorite one that I made.  There is only one because I had only one dried squash top and one dried shelf mushroom.  I am going to make more next fall after I gather more tops and shrooms.  He is sitting on a pinecone like the vintage ones in the bowers.  I will ponder if I want to make some similar but in bowers.

CIMG3363

View from back, you can see his mushroom cape and that he sits on a pinecone.  Body is an acorn.

CIMG3364

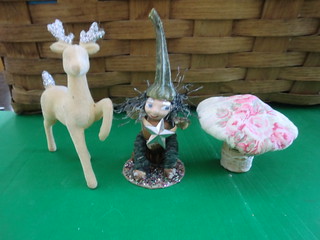
Here he is with a vintage reindeer and a mushroom that I made a a while ago.

CIMG3365

Thanks for looking!

I'm linking up to Vintage Inspiration Party at Beyond the Picket Fence, The Sunday Showcase by Stephanie Lynn, Block Party at Keeping it Simple Crafts, ShareYour Creativity Link Party at Its Overflowing and Lets Talk Vintage at Bella Rosa Antiques.  Be sure to check out the other fab projects!

Kathy


Tuesday, November 20, 2012

Coffee bag wallets

I know these have been around for a while, but I had all these coffee bags that I didn't want to throw away.
And I discovered that not only do they smell nice, but they are thin, thin, thin!  Carrying one in my back pocket is like not having a wallet at all, even stuffed with bills to go to the Farmer's Market.

CIMG2717

A friend is having a craft show in her home, and I'll be selling plate flowers.  But I want to make some crazy stuff to give more variety and a market feeling.  Last year I sold mushroom ornaments and fabric brooches in addition.  May do that again too.

Any one else making crafts to sell?

Kathy

Sunday, December 11, 2011

Upcycled Shabby Shrooms Christmas ornaments

I obsessively made 45.

Roses, hung with embroidery cotton and a small button.

Photobucket

Red with white spots, paired with a small german spun cotton shroom and sitting on a clothespin.

Photobucket

Same as above but pink.

Photobucket

Red one in the hibiscus tree:

Photobucket

Made with my childhood bedspread (50 yrs old) which really fell apart last time I washed it, and wine corks which I have plenty of!

Thanks for looking.

Check out some amazing creations at Motivate Me Monday over at Keeping it Simple and at Stephanie Lynn's Sunday Showcase and Thrifty Things Friday at the Thrifty Groove.
Kathy

Friday, November 18, 2011

More flower brooches

I just can't stop folding petals.

What to charge for them is the hard part.

Photobucket

Linking up to Lit and Laundry's Finished for Friday again. Check out the other projects there!

See Wednesdays post for the link to instructions and explanation of my little changes.

Kathy

Wednesday, November 16, 2011

Kanzashi flower brooches

This is what I've been working on the past couple of days. I found very detailed instructions plus a video to make fabulous Kanzashi flowers. I just did the big flower part and took the easy route by using buttons and what have you for the centers. They are about 3 1/2 inches across.

Photobucket

Making the flowers is fun - kind of like origami with fabric. One thing that I did differently - I didn't iron the first fold after the first flower. So much faster. And it came out exactly the same. I'm not trying to win a contest, just to make some pretty brooches.

Added later: Another thing I am doing differently is I do knot the thread so it is easier to keep track of and I don't accidentally pull it through. I may try leaving the other end on the needle when I tie the final knot. Sometimes it is hard to see.

Let me know what you think!
AND check out other projects at Whatever Goes Wednesday at Someday Crafts, and Finished for Friday at Lit and Laundry.
Kathy

Saturday, November 5, 2011

Painting plates to use in garden art

I'm linking up to Bunny Jeans Bunny Hop Party. And the Under $100 Linky Party at Beyond the Picket Fence. Check out the other projects!
I've been painting plates lately, mostly small ones to use as centers for my plate flowers:

Photobucket

Photobucket

Photobucket

Photobucket

I've never painted much. It is fun. I'm going to do ivory accent lines on the sunflowery one to make the petals sharper. Pebeo 150 paints. Baking in the oven makes the paint glass-like and hard.

It just occurred to me when I was looking at one of the little cups that they would be very nice Christmas ornaments. I may hang my small painted plates on the tree this year.

The pebeo paints are expensive but the plates are often 25 cents or less! I started with 3 colors, and black pen and a gold outliner. With a Michaels 50% off coupon for one item the total was around $20. If you bought a kit instead of individual you could save even more with the coupon!


Kathy

Tuesday, January 4, 2011

My Christmas Tree is still up!

I've been obsessively playing with the Kindle that dh got me for Christmas. I was in a lull from studying spanish, but now with Spanish books and dictionary loaded I can read and just move the cursor to words I don't know, and with luck, the dictionary recognizes them and tells me in a little screen at the top or bottom of the page.

Plus I've been buying or loading free books. Yikes! Its a time sink!

Meanwhile my beautiful pillow fabric sits waiting to be sewn.

I'm making a commitment to myself to post the newly made pillows and other things next week, Tuesday. I do so much better with deadlines.

I didn't see one of my friends until after Christmas, and Ididn't have the right size box for her gift so I made a little house with a roof that opens up out of some old file folders. I glued stones on the eaves so the box would stay closed. Little houses could be decorated differently for other occassions. Here it is:


Posted by Picasa

What's the longest you've left up your Christmas tree? I'll tell my date next post.

Kathy

Monday, December 13, 2010

Woman Cave In Progress Brag plus need help about what to do on one wall.

My not very comfy sewing room and furniture and stuff catchall is what our upstairs hallway/living room used to be. This fall I began the work to convert it into my own hang out spot. Dispite that it has 6 door openings there is a nice sitting area down by the south facing double window.

Here is the only before I could find, with some of the paneling already down. You can see some old wallpaper under the plastic vapor barrier that my husband put up (yes he took the paneling down to do it) after blowing in insulation when he bought the house.

 
Posted by Picasa

 
This pretty wall paper was on the one wall that wasn't paneled. I love it and I enjoyed it for many years, but it was old and beat up, so it went with the rest of the wallpaper.


Here is a pic of the space in progress, with the plastic down.
 
Posted by Picasa


Hooray! The wallpaper is stripped off the walls and walls and ceiling are repaired and a layer of plaster applied. Walls painted a cool green. Here is my new chartreuse couch. My sewing machine plays double duty as a side table with a groovy lamp on it. I want to get a nice big piece of art work to hang over the couch.
 
My house doesn't have a fireplace (or mantel clearly) but this old dh family heirloom marble topped bureau which stores our bed linens can be my mantel I realized.
QUESTON ??? Should I put a mirror over it? The one that came with it I don't like. What about a big round one? Or something else?
 
I saved some of the green wallpaper which I have framed and plan to hang on the wall where it used to be.
 
So here is the sitting room end, by the window. Sorry it was hard to photograph due to the bright window. To take the photo I'm standing with the marble topped bureau on my right and my sewing cutting (or craft) table on my left.
I've had my neighbor women's group over. And I spend a lot of time there. I love it! Though I still have a way to go, decorating reupholstering the chairs you can't see.
 
Posted by Picasa

Posted by Picasa
I was inspired by a Jamie Drake room. I may give more details about that in future posts. The room is lighter and less earth tones that my dlowstairs living room.

Thanks for looking.
I'm hooking up to Bobbypin's Boardwalks Bragfest and Project Diaries at Stories of a House. Check out the other fun projects!

Kathy

The Boardwalk Bragfest

Photobucket