I've been wanting to do more with refashioning the clothes I have, or remaking thrifted ones rather than buying new. So I joined the refashion coop blog. The rule is that I have to post 1x/month at least, so that will help me to complete sewing projects so I can post about them. There are so many talented sewists there!
Check out my first post if you're interested in such things in which I refashion a blouse to wear to a job interview. While you are there look around!
TFL
Kathy
My post on refashion coop
Saturday, March 31, 2012


Monday, March 19, 2012
Knitting, knitting knobbys, spool knitting, french knitting...
In January when I started this post, I'd had a very bad cold and been rattling around the house. Finished this shawl designed by Deb at FullCircleQuirk after not knitting for many years. In winter my mind turns to fiber arts.

I found myself thinking about the knitting knobby I had as a child. And wondering if any of my friend's or their children on our street would be interested in learning. First I had to see if I could do it myself. I don't have a knobby anymore but I found a cool one made from copper pipe on line HERE and totally copied it. Luckily all supplies were in the basement workshop. I did add a copper joiner piece to the top because I was to impatient to grind the pipe as smoothly as I should have. I love its kind of craftsman steampunk style.

Black yarn was handy and I remembered after a foot or so that I need a tie for a black cotton robe. The Lion brand chunky varigated yarn i got at a discount store and I'm going to make it as long as possible then decide what to do with it.

Then I went nuts and made more of them, one from a tin can and one from pens.

I can't find the blog where I saw the genius idea of using pens. You put 2 pony beads held with little elastics between each pen (an inch or more from the ends) with the ink part removed. I used el cheapo pens from the dollar store and they didn't have a top cap like the ones in the blog so I put an elastic on each so the yarn wouldn't slip off. You can add more pens or take some out, or even knit straight instead of in a circle. If anyone knows the blog I'd be happy to credit the person. The tin can one has bent paper clips. I bent the small part of large paperclips down and used 2 pliers to bend the large ends. Then I taped them evenly spaced around the tin can. BTW, I have one of those can openers that leaves an edge that isn't sharp. Here are close ups of how the "knitting" is turning out.

The Pens you are looking at the inside. Its turning out similar to the tin can. Almost like I dropped all of the pearl stitches in a ribbing stitch. I kind of like it.

I also bought this little child's singer knitting machine for a dollar at a thrift store. Its missing the tension control, but I just wrapped the yarn around the top of a chair. Luckily the directions came with it. The soft green acrylic yarn works better than the wool knitting worsted.


Here is the reject, but it made me realize that by dropping stitches, or turning around on my other spool knitters, I can create spaces for thumbs or whatever.

I'm imagining making Franken-gloves. Fingers are almost never long enough for me. But now its in the 70s F, and who needs gloves!
Hopefully I'll teach my friends 3 little girls soon and will be able to report on that.
I'm linking up to The Thrifty Groove Thrifty Things Friday. AND Twig Studios Sunday Showoff! Check out the cool things in both places!
Kathy

I found myself thinking about the knitting knobby I had as a child. And wondering if any of my friend's or their children on our street would be interested in learning. First I had to see if I could do it myself. I don't have a knobby anymore but I found a cool one made from copper pipe on line HERE and totally copied it. Luckily all supplies were in the basement workshop. I did add a copper joiner piece to the top because I was to impatient to grind the pipe as smoothly as I should have. I love its kind of craftsman steampunk style.

Black yarn was handy and I remembered after a foot or so that I need a tie for a black cotton robe. The Lion brand chunky varigated yarn i got at a discount store and I'm going to make it as long as possible then decide what to do with it.

Then I went nuts and made more of them, one from a tin can and one from pens.

I can't find the blog where I saw the genius idea of using pens. You put 2 pony beads held with little elastics between each pen (an inch or more from the ends) with the ink part removed. I used el cheapo pens from the dollar store and they didn't have a top cap like the ones in the blog so I put an elastic on each so the yarn wouldn't slip off. You can add more pens or take some out, or even knit straight instead of in a circle. If anyone knows the blog I'd be happy to credit the person. The tin can one has bent paper clips. I bent the small part of large paperclips down and used 2 pliers to bend the large ends. Then I taped them evenly spaced around the tin can. BTW, I have one of those can openers that leaves an edge that isn't sharp. Here are close ups of how the "knitting" is turning out.

The Pens you are looking at the inside. Its turning out similar to the tin can. Almost like I dropped all of the pearl stitches in a ribbing stitch. I kind of like it.

I also bought this little child's singer knitting machine for a dollar at a thrift store. Its missing the tension control, but I just wrapped the yarn around the top of a chair. Luckily the directions came with it. The soft green acrylic yarn works better than the wool knitting worsted.


Here is the reject, but it made me realize that by dropping stitches, or turning around on my other spool knitters, I can create spaces for thumbs or whatever.

I'm imagining making Franken-gloves. Fingers are almost never long enough for me. But now its in the 70s F, and who needs gloves!
Hopefully I'll teach my friends 3 little girls soon and will be able to report on that.
I'm linking up to The Thrifty Groove Thrifty Things Friday. AND Twig Studios Sunday Showoff! Check out the cool things in both places!
Kathy
Friday, January 20, 2012
More mushrooms
Here is what I did with the mushroom blanks I had left. (I ran out of white paint, so didn't finish off all my mushrooms for the craft show and gifts.) when I finally picked up my room after Christmas, I didn't want to pack them away as is so finished them off.


I like how they look on my woman cave/sewing room "mantle" (a marble topped bureau from dh's mothers family that I keep bed linens in.)

Hopefully will be over a terrible cold soon, so I have time for creating!
Kathy


I like how they look on my woman cave/sewing room "mantle" (a marble topped bureau from dh's mothers family that I keep bed linens in.)

Hopefully will be over a terrible cold soon, so I have time for creating!
Kathy
Sunday, December 11, 2011
Upcycled Shabby Shrooms Christmas ornaments
I obsessively made 45.
Roses, hung with embroidery cotton and a small button.

Red with white spots, paired with a small german spun cotton shroom and sitting on a clothespin.

Same as above but pink.

Red one in the hibiscus tree:

Made with my childhood bedspread (50 yrs old) which really fell apart last time I washed it, and wine corks which I have plenty of!
Thanks for looking.
Check out some amazing creations at Motivate Me Monday over at Keeping it Simple and at Stephanie Lynn's Sunday Showcase and Thrifty Things Friday at the Thrifty Groove.
Kathy
Roses, hung with embroidery cotton and a small button.

Red with white spots, paired with a small german spun cotton shroom and sitting on a clothespin.

Same as above but pink.

Red one in the hibiscus tree:

Made with my childhood bedspread (50 yrs old) which really fell apart last time I washed it, and wine corks which I have plenty of!
Thanks for looking.
Check out some amazing creations at Motivate Me Monday over at Keeping it Simple and at Stephanie Lynn's Sunday Showcase and Thrifty Things Friday at the Thrifty Groove.
Kathy
Friday, November 18, 2011
More flower brooches
I just can't stop folding petals.
What to charge for them is the hard part.

Linking up to Lit and Laundry's Finished for Friday again. Check out the other projects there!
See Wednesdays post for the link to instructions and explanation of my little changes.
Kathy
What to charge for them is the hard part.

Linking up to Lit and Laundry's Finished for Friday again. Check out the other projects there!
See Wednesdays post for the link to instructions and explanation of my little changes.
Kathy
Wednesday, November 16, 2011
Kanzashi flower brooches
This is what I've been working on the past couple of days. I found very detailed instructions plus a video to make fabulous Kanzashi flowers. I just did the big flower part and took the easy route by using buttons and what have you for the centers. They are about 3 1/2 inches across.

Making the flowers is fun - kind of like origami with fabric. One thing that I did differently - I didn't iron the first fold after the first flower. So much faster. And it came out exactly the same. I'm not trying to win a contest, just to make some pretty brooches.
Added later: Another thing I am doing differently is I do knot the thread so it is easier to keep track of and I don't accidentally pull it through. I may try leaving the other end on the needle when I tie the final knot. Sometimes it is hard to see.
Let me know what you think!
AND check out other projects at Whatever Goes Wednesday at Someday Crafts, and Finished for Friday at Lit and Laundry.
Kathy

Making the flowers is fun - kind of like origami with fabric. One thing that I did differently - I didn't iron the first fold after the first flower. So much faster. And it came out exactly the same. I'm not trying to win a contest, just to make some pretty brooches.
Added later: Another thing I am doing differently is I do knot the thread so it is easier to keep track of and I don't accidentally pull it through. I may try leaving the other end on the needle when I tie the final knot. Sometimes it is hard to see.
Let me know what you think!
AND check out other projects at Whatever Goes Wednesday at Someday Crafts, and Finished for Friday at Lit and Laundry.
Kathy
Saturday, November 5, 2011
Painting plates to use in garden art
I'm linking up to Bunny Jeans Bunny Hop Party. And the Under $100 Linky Party at Beyond the Picket Fence. Check out the other projects!
I've been painting plates lately, mostly small ones to use as centers for my plate flowers:


I've never painted much. It is fun. I'm going to do ivory accent lines on the sunflowery one to make the petals sharper. Pebeo 150 paints. Baking in the oven makes the paint glass-like and hard.
It just occurred to me when I was looking at one of the little cups that they would be very nice Christmas ornaments. I may hang my small painted plates on the tree this year.
The pebeo paints are expensive but the plates are often 25 cents or less! I started with 3 colors, and black pen and a gold outliner. With a Michaels 50% off coupon for one item the total was around $20. If you bought a kit instead of individual you could save even more with the coupon!
Kathy
I've been painting plates lately, mostly small ones to use as centers for my plate flowers:


I've never painted much. It is fun. I'm going to do ivory accent lines on the sunflowery one to make the petals sharper. Pebeo 150 paints. Baking in the oven makes the paint glass-like and hard.
It just occurred to me when I was looking at one of the little cups that they would be very nice Christmas ornaments. I may hang my small painted plates on the tree this year.
The pebeo paints are expensive but the plates are often 25 cents or less! I started with 3 colors, and black pen and a gold outliner. With a Michaels 50% off coupon for one item the total was around $20. If you bought a kit instead of individual you could save even more with the coupon!
Kathy
Sunday, October 30, 2011
Another dog outfit
I have mentioned that my little dog gets cold very easily. I found this gap sweater at a thrift store for $4.00. Its cotton, mens XL.

I cut one of the arms off...I cut it so that the stitching holding it to the body came with the arm, to help prevent it from unraveling.

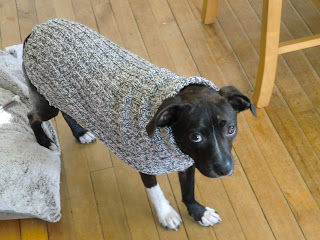
Then I cut along the sleeve side seam starting form the shoulder and moving toward the cuff. I saved enough near the cuff to make a rolled turtle neck and a breast piece. I used another doggie clothing article to measure how far to cut. But you could measure your dog. It needs to open up just before his front legs.


Slide it on over his head! Its pretty fashionable don't you think?
I may crochet around the edges to finish it off and perhaps a little flap and button under the belly to help hold it in place. He wore it yesterday in his crate on our trip to Boston. Very comfy for sleeping in the car!
Kathy

I cut one of the arms off...I cut it so that the stitching holding it to the body came with the arm, to help prevent it from unraveling.


Then I cut along the sleeve side seam starting form the shoulder and moving toward the cuff. I saved enough near the cuff to make a rolled turtle neck and a breast piece. I used another doggie clothing article to measure how far to cut. But you could measure your dog. It needs to open up just before his front legs.


Slide it on over his head! Its pretty fashionable don't you think?
I may crochet around the edges to finish it off and perhaps a little flap and button under the belly to help hold it in place. He wore it yesterday in his crate on our trip to Boston. Very comfy for sleeping in the car!
Kathy
Monday, October 24, 2011
I've been painting saucers
Pebeo porcelain 150 paints.
These are my initial experiments, not yet baked in the oven.
I'll post a pic after the cooking. Since the paint is dishwasher safe once cooked, I'm hoping they will last in the garden as plate flower centers.

I am not a painter. I wouldn't know what to do with a big plate, but these little saucers were fun! Since the paint is expensive I bought only 3 colors, plus a black "pen" and a gold outliner.
Thanks for looking.
Kathy
These are my initial experiments, not yet baked in the oven.
I'll post a pic after the cooking. Since the paint is dishwasher safe once cooked, I'm hoping they will last in the garden as plate flower centers.

I am not a painter. I wouldn't know what to do with a big plate, but these little saucers were fun! Since the paint is expensive I bought only 3 colors, plus a black "pen" and a gold outliner.
Thanks for looking.
Kathy
Sunday, October 2, 2011
Quick dog coat
I'm making a winter coat with a breast piece and everything from a womens XL quilted jacket for Iggie, but I needed a quick coat yesterday. So I had noticed that the sleeves of the coat were basically the right shape for a doggie cape. Here you see I cut out a scoop for his head. The long ends will be velcroed in the front of his neck.

Cut down a neck tie with one end sewn on top middle and the other velcroed across after passing under his tummy to hold in place: Voila!

Some of the edges should be finished, but because of the way the coat was made some of them don't need to be.
Thanks for looking.
Kathy

Cut down a neck tie with one end sewn on top middle and the other velcroed across after passing under his tummy to hold in place: Voila!

Some of the edges should be finished, but because of the way the coat was made some of them don't need to be.
Thanks for looking.
Kathy
Thursday, August 4, 2011
10 more plate flowers
Now I have 40 new ones. All need hangers attached, not the most fun part of it.


I'm giving the 5 turquoise ones to a friend on Saturday.
TFL
Kathy


I'm giving the 5 turquoise ones to a friend on Saturday.
TFL
Kathy
Tuesday, August 2, 2011
Too much glass! Work in Progress
I'm trying to clean out my study. I'm not sure what I will do with these when I'm done, but I'm making plate flowers. Attaching the hangers for so many will be a huge job, but at least I've gotten the glass out of my study! I will also add embellishments to many of them.


TFL
Kathy


TFL
Kathy
Friday, July 29, 2011
Mosaic works in progress
Here is my current mosaic work in progress, sitting on a lazy susan for easy turning. I was using this clay pot upsidedown on my porch as a plant stand. I am using thinset to apply the glass, but I don't trust the cheap clay pot ($12 at Biglots) out for winter, so I will keep it as a plant stand on my porch.
My concept is a luna moth on a tree trunk, and on the back of the tree a little birch tree grows. I'm going to mosaic a saucer and attach it to the top, not sure how that will fit with the theme, maybe just cover it with leaves.


And here are some bricks that my friend Susan and I mosaicked to go into the corners of a planter in our downtown. I call them, Bright Lights Big City Rubicks Cube


Thanks for looking!
Kathy
My concept is a luna moth on a tree trunk, and on the back of the tree a little birch tree grows. I'm going to mosaic a saucer and attach it to the top, not sure how that will fit with the theme, maybe just cover it with leaves.


And here are some bricks that my friend Susan and I mosaicked to go into the corners of a planter in our downtown. I call them, Bright Lights Big City Rubicks Cube


Thanks for looking!
Kathy
Sunday, June 5, 2011
Iggy is growing up, and I'm having trouble posting comments!

Here is little Iggy. He is almost 6 mo. old and weighs 20 pounds.
I have tried to post comments on several blogs such as Stephanie's, and I end up in an endless loop of being directed to the google account sign on page even tho I am signed in and I went to the blogs from my dashboard.
So I'm giving up for a few days! I'll try again and hope the problem is fixed.
Kathy
Thursday, May 19, 2011
Mosaic Lamp completed
I took a mosaic class at the local art gallery with a couple of friends last winter. My class project is hanging on our back porch. Since then I've made a little mosaic table. And I've been saving plates with roses on them because my grown up foster daughter loves roses. In my last post, I showed the beginnings of the lamp I am making for her.
Here it is with everything glued on, ready to grout:

And here it is grouted:


She likes it. Yay!
The Process: Its easy, just takes time. Lots of time. I find it very restful, fitting the pieces together. I used the wheeled nippers that I got in my class mostly, to cut the dishes. Then I tumbled the shards in a little rock tumbler with water and a drop of dish soap. The pretty white glass tiles were at HD for $5 /sheet. I cut some of those in advance and tumbled them too. Anything that I cut to fit as I went, I filed the sharp edge. Glued everything down with Weldbond (for inside or covered porch objects only - it is water based.) Then grouted with sanded grout. I wish I had lightened up the grey just a tad. But generally I like it. I also really wanted a 6 sided shade in white, but I couldn't find one (only cream), so I settled on this 8 sided one.
Thanks for looking.
Kathy
Here it is with everything glued on, ready to grout:

And here it is grouted:


She likes it. Yay!
The Process: Its easy, just takes time. Lots of time. I find it very restful, fitting the pieces together. I used the wheeled nippers that I got in my class mostly, to cut the dishes. Then I tumbled the shards in a little rock tumbler with water and a drop of dish soap. The pretty white glass tiles were at HD for $5 /sheet. I cut some of those in advance and tumbled them too. Anything that I cut to fit as I went, I filed the sharp edge. Glued everything down with Weldbond (for inside or covered porch objects only - it is water based.) Then grouted with sanded grout. I wish I had lightened up the grey just a tad. But generally I like it. I also really wanted a 6 sided shade in white, but I couldn't find one (only cream), so I settled on this 8 sided one.
Thanks for looking.
Kathy
Sunday, April 24, 2011
Work in Progress: Mosaic Lamp
I have a bunch of lamps from when I used to decoupage them.
I've been collecting plates with roses for a while. And I chopped them up the other day and realized they looked good with the shimmery glass tiles I'd picked up at HD.

So here is an ugly lamp with 6 somewhat flattish sides, and I have the lower half of 3 sides done...

I want to have it done by Wednesday to give as a gift. That means to have it ready to grout by Tuesday. But I had to go into work this weekend, so I'm off schedule!
Thanks for looking.
Kathy
I've been collecting plates with roses for a while. And I chopped them up the other day and realized they looked good with the shimmery glass tiles I'd picked up at HD.

So here is an ugly lamp with 6 somewhat flattish sides, and I have the lower half of 3 sides done...

I want to have it done by Wednesday to give as a gift. That means to have it ready to grout by Tuesday. But I had to go into work this weekend, so I'm off schedule!
Thanks for looking.
Kathy
Thursday, April 14, 2011
Mosaic Table, new puppy and I'm glad to be back.
I've had to be on line less for a while, but now I'm back. I was scared I wouldn't have any followers left. Thank you for sticking with me.
I'm linking up to Whatever Goes Wednesday at Someday Crafts, check out the great craft projects there!
Here is a mosaic table top that I just finished grouting. My concept is that a bird has flown out of a stained glass window to grab a bug out of the mosaic table. The hunt for dishes to break is a lot of fun. And now when I break something in my kitchen I'm not upset any more because I pick up the pieces and put them in my mosaic box.
Msaicking is a learning process and I hope to keep improving. Next I may mosaic the sides or I may take a break and mosaic a wooden bowl. Note added: Actually I have decided to use the plates I've been collecting with roses on them to mosaic a lamp for my grown up foster daughter who loves roses.
All you need are wheeled nippers, some dishes, and some weldbond glue! I'm not giving instructions because they are all over the web.

AND I have a new puppy, here is Iggy sleeping next to Zorro. As I type this he is next to my other cat Ringo. I feel very fortunate that the kitties tolerate him. He's been a lot of fun.

Here he is on my lap:

Thanks for looking!
I'm off to catch up on some blogs.
Kathy
I'm linking up to Whatever Goes Wednesday at Someday Crafts, check out the great craft projects there!
Here is a mosaic table top that I just finished grouting. My concept is that a bird has flown out of a stained glass window to grab a bug out of the mosaic table. The hunt for dishes to break is a lot of fun. And now when I break something in my kitchen I'm not upset any more because I pick up the pieces and put them in my mosaic box.
Msaicking is a learning process and I hope to keep improving. Next I may mosaic the sides or I may take a break and mosaic a wooden bowl. Note added: Actually I have decided to use the plates I've been collecting with roses on them to mosaic a lamp for my grown up foster daughter who loves roses.
All you need are wheeled nippers, some dishes, and some weldbond glue! I'm not giving instructions because they are all over the web.

AND I have a new puppy, here is Iggy sleeping next to Zorro. As I type this he is next to my other cat Ringo. I feel very fortunate that the kitties tolerate him. He's been a lot of fun.

Here he is on my lap:

Thanks for looking!
I'm off to catch up on some blogs.
Kathy
Subscribe to:
Posts (Atom)


