Friday, October 31, 2014
Allow Americans to pay ransom to terrorists?!!!!
I know this is a craft blog but I'm so upset at what Scott Brown, who is running for US senator in New Hampshire said last night in the debate with Senator Shaheen that I have to comment everywhere in my (admittedly rather small) realm. If we start paying terrorists ransom money, Americans will be snapped up everywhere for money. Think of the danger that this puts our troops in and possibly even tourists. Scott Brown either you are so deep into the Republican mission to say that nothing President Obama does is correct that you will say anything in opposition without thinking or you are truly an idiot. Either way you do not belong in the US Senate.


Wednesday, April 2, 2014
Head vase
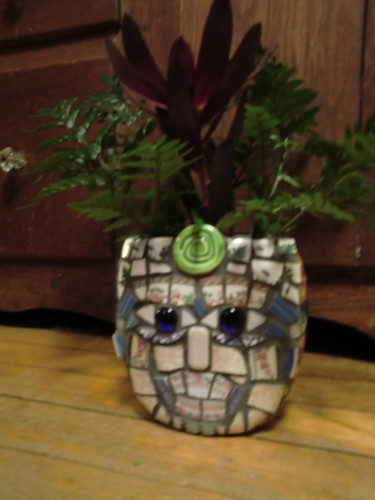
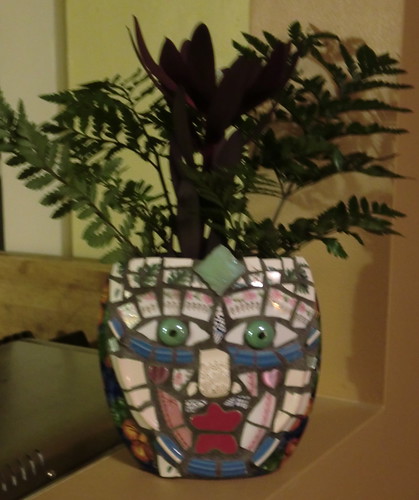
I wanted to learn to make faces out of broken dishes. I learned a lot while making these faces. Next, on to planters. I love the ones where the plants look like the hair. Good sized face pots typically cost over $100! So I'm hoping to get my technique down and make some of those next.
This is a small vase with 2 flatish sides that I picked up at a yard sale. I had the weldbond glue and the grout and the dishes. If this was for outdoors I would have attached the dish shards with either silicone or thinset which is what I will do when I make the pots.
My first face, needs stronger lips:
I like this one better, but find it a little scarey.
Thanks for looking. Check out a LOT of fabulous ideas at Whatever Goes Wednesday at Someday Crafts., Weekly Link Party 7 at Just Between Friends, Under $100 Link Party at Beyond the Picket Fence! and the Share Your Creativity Party 109 at Its Overflowing .
Kathy
This is a small vase with 2 flatish sides that I picked up at a yard sale. I had the weldbond glue and the grout and the dishes. If this was for outdoors I would have attached the dish shards with either silicone or thinset which is what I will do when I make the pots.
My first face, needs stronger lips:
I like this one better, but find it a little scarey.
Thanks for looking. Check out a LOT of fabulous ideas at Whatever Goes Wednesday at Someday Crafts., Weekly Link Party 7 at Just Between Friends, Under $100 Link Party at Beyond the Picket Fence! and the Share Your Creativity Party 109 at Its Overflowing .
Kathy
Monday, February 17, 2014
Mosaic Stand, not yet grouted.
I started this almost 3 years ago and got stuck and put it aside because I was unhappy with parts of it. And the back ground was very hard because I should have marked guide lines on the pot but didn't. In the last week I tackled the problems and made some changes and finished the picky tiles in lines background. It was definitely a learning experience, and will continue to be when I grout it in the spring as I am determined to use 4 or 5 different grout colors (outside!).
The whole thing is still sitting on a lazy susan, and the plate on top is not attached but I probably will use it so.
I was inspired by a beautiful luna moth that stayed for a full day on a telphone pole outside our house.
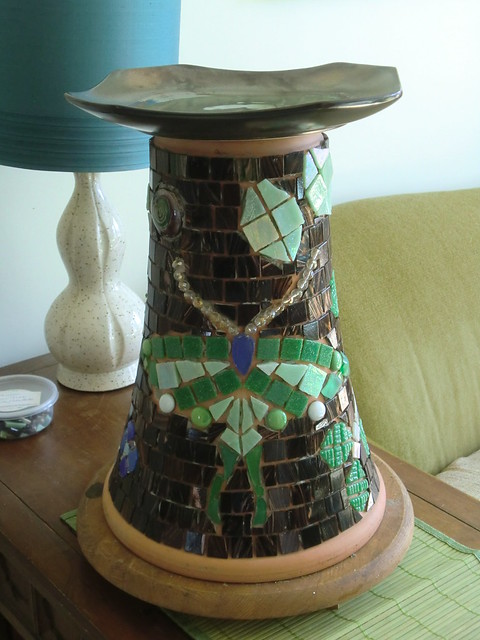
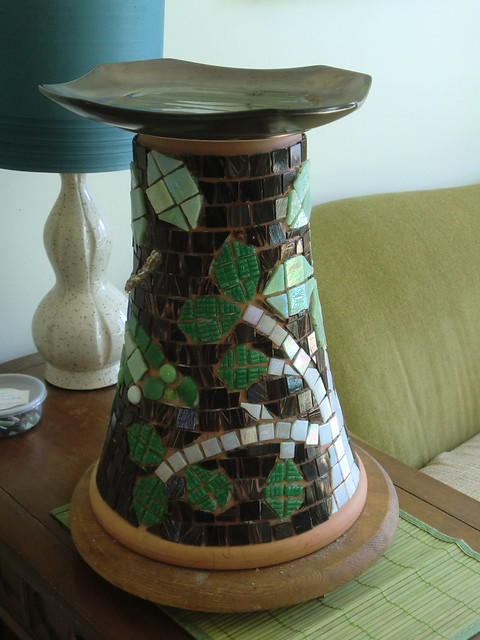
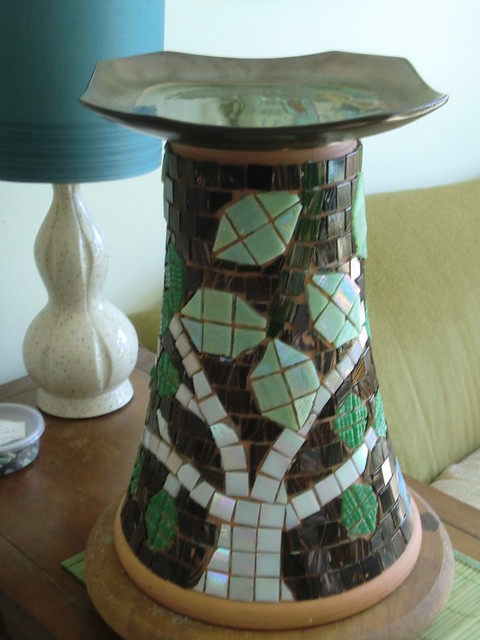
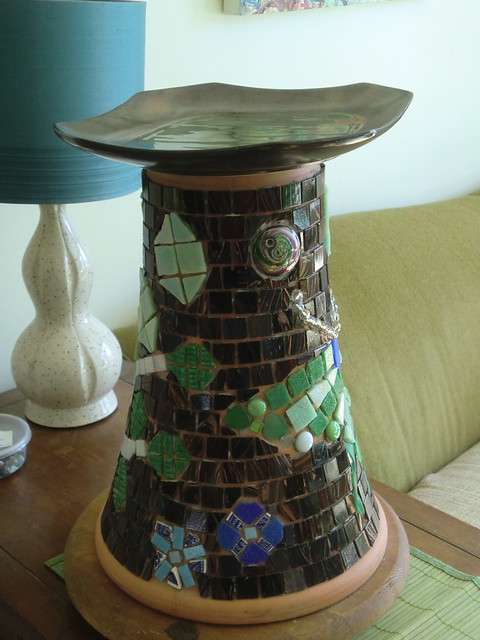
The green moth and the birch tree are the "fronts", the sides are a little boring. I will probably paint the terra cotta top and bottom edges, not sure what color yet.
And it will go on one of my porches as a little chair side table or plant stand.
Thanks for looking.
I'm linking up to Stephanie Lynn's Sunday Showcase at Under The Table and Dreaming and The Weekly Link Party #2 at Just Between Friends. Check out the other great projects there!
Kathy
The whole thing is still sitting on a lazy susan, and the plate on top is not attached but I probably will use it so.
I was inspired by a beautiful luna moth that stayed for a full day on a telphone pole outside our house.
The green moth and the birch tree are the "fronts", the sides are a little boring. I will probably paint the terra cotta top and bottom edges, not sure what color yet.
And it will go on one of my porches as a little chair side table or plant stand.
Thanks for looking.
I'm linking up to Stephanie Lynn's Sunday Showcase at Under The Table and Dreaming and The Weekly Link Party #2 at Just Between Friends. Check out the other great projects there!
Kathy
Friday, September 6, 2013
Office Chair Makeover
We bought our foster daughter this chair 20 years ago from a used office furniture warehouse. She was into rose colors at the time. 20 years later it is very beat up and the picture doesn't really show how awful. The almond colored plastic base is all yellowed and cracked and gross.

Its been in my study looking terrible. I want some practice with reupholstering before I tackle big projects so I decided to remake this chair on Labor Day afternoon. My rule was that I couldn't buy anything but had to use what I have on hand. (I have too much stuff, gotta use it up!)
So I took it apart and spray painted the plastic and metal pieces.
The back of the back rest really does pop off!
Lots of screws to remove everywhere else.
I decided to to use a brown-bronzy textured paint on the plastic base and metal piece that connects the back of the chair to the seat; and brown spray paint on the plastic piece on the back of the back rest (what do you call those things).
I painted the plastic parts with rust-oleum for Plastic spray paint in dark green first, hoping that would help the bronzy stuff stick since it is technically for metal.

I realized too late I didn't need to waste any of the bronzy paint on that big plastic piece from under the seat because it doesn't show. Oh well.
Here is the plastic back of the back piece in progress.

The dark brown was almost empty and it is water based. We'll see how it goes over time.
While the paint was drying I stapled fabric onto the seat and back piece. Hint: use long staples in your staple gun. I had to hammer then in sometimes too. I also wish I'd taken a few pictures before I took the chair apart because I got a few staples out of the area covered by the back cover. They tend to blend in with the fabric fortunately. And the corners are not perfect partly because the fabric is totally not stretchy.
I used some upholstery fabric that I had bought a couple years ago for a different project then changed my mind.
Putting it back together was a bit of a challenge. Again pictures or even a note or two would have helped, but I did it with Iggy's help!

I'm happy with it. What do you think? Here is the before and after together for comparison.

I'm linking up to Whatever Goes Wednesday at Someday Crafts. Also Thrifty Things Friday at The Thrifty Groove. Check out the other great projects there!
On the next thing!
Kathy
Its been in my study looking terrible. I want some practice with reupholstering before I tackle big projects so I decided to remake this chair on Labor Day afternoon. My rule was that I couldn't buy anything but had to use what I have on hand. (I have too much stuff, gotta use it up!)
So I took it apart and spray painted the plastic and metal pieces.
The back of the back rest really does pop off!
Lots of screws to remove everywhere else.
I decided to to use a brown-bronzy textured paint on the plastic base and metal piece that connects the back of the chair to the seat; and brown spray paint on the plastic piece on the back of the back rest (what do you call those things).
I painted the plastic parts with rust-oleum for Plastic spray paint in dark green first, hoping that would help the bronzy stuff stick since it is technically for metal.
I realized too late I didn't need to waste any of the bronzy paint on that big plastic piece from under the seat because it doesn't show. Oh well.
Here is the plastic back of the back piece in progress.
The dark brown was almost empty and it is water based. We'll see how it goes over time.
While the paint was drying I stapled fabric onto the seat and back piece. Hint: use long staples in your staple gun. I had to hammer then in sometimes too. I also wish I'd taken a few pictures before I took the chair apart because I got a few staples out of the area covered by the back cover. They tend to blend in with the fabric fortunately. And the corners are not perfect partly because the fabric is totally not stretchy.
I used some upholstery fabric that I had bought a couple years ago for a different project then changed my mind.
Putting it back together was a bit of a challenge. Again pictures or even a note or two would have helped, but I did it with Iggy's help!
I'm happy with it. What do you think? Here is the before and after together for comparison.
I'm linking up to Whatever Goes Wednesday at Someday Crafts. Also Thrifty Things Friday at The Thrifty Groove. Check out the other great projects there!
On the next thing!
Kathy
Saturday, July 20, 2013
Three dress to skirt refashions, 1 failure, 2 okay
I got two almost identical XL dresses in India print at a TS for a couple of bucks each, thinking they would fit my foster daughter. They did fit but were not flattering. So I decided to try to make something for me. I only took a before pic of this one, but there is also a red print which is the second refashion in the post.


Another sewist who posted at the Refashion Coop had added a skirt to a pants waistband and top so I thought I would try that with the top of these old linen pants which have never fit me well.
So I cut the skirt off the dress at the gathers and attached it to the pants top.
Then.... disappointment! What was I thinking. I have no idea what to do with these now. About all I can say for this skirt is that it fits. Too much pant part and too much gathers, I think. The trouble is the pockets of the pants go low. I may try to redo this (later, much later).
Ok the red dress is next. I had seen a cute skirt in Anthro with a similar print and a dropped waist. So this time I cut the skirt off above the gathers, just below the armholes to leave room for a casing and have the gathers drop to the hips.
And put some nicer buttons (that I got at the same TS, later) to replace the plastic wood look standard cheapo ones that the dress came with. There weren't enough of one style so I used two cute small ones at the top and the larger ones you see for the rest.
Turned under to make a waistband and put elastic in elastic. I sewed up the button up front, tho I kept the look of it. I think its ok. Not sure I like how I styled it in this photo, but you get the idea.
I wish I had made it a bit longer. Still could I guess!
Finally, I found a wild colorful too large print dress at a TS. It was a sleeveless pull on. I cut it off under the arms, took in the sides (with my new serger - love it so much), saved some fabric when I took in the sides at the bottoms for the side vents.
Finally, I found a wild colorful too large print dress at a TS. It was a sleeveless pull on. I cut it off under the arms, took in the sides (with my new serger - love it so much), saved some fabric when I took in the sides at the bottoms for the side vents.
I like it, and its a nice length.
So I'm not really thrilled with even the 2nd two which I have worn and will wear again. Even so, one of the wonderful things about refashioning is that I am improving my sewing skills and trying styles without spending much money.
I'm linking up to Motivate Me Monday at Keeping It Simple and What to Do Weekends at Crafts a la Mode. and Refashion First Friday. Check out the amazing other projects!
I'm linking up to Motivate Me Monday at Keeping It Simple and What to Do Weekends at Crafts a la Mode. and Refashion First Friday. Check out the amazing other projects!
Thanks for looking.
Kathy
Tuesday, November 20, 2012
Coffee bag wallets
I know these have been around for a while, but I had all these coffee bags that I didn't want to throw away.
And I discovered that not only do they smell nice, but they are thin, thin, thin! Carrying one in my back pocket is like not having a wallet at all, even stuffed with bills to go to the Farmer's Market.

A friend is having a craft show in her home, and I'll be selling plate flowers. But I want to make some crazy stuff to give more variety and a market feeling. Last year I sold mushroom ornaments and fabric brooches in addition. May do that again too.
Any one else making crafts to sell?
Kathy
And I discovered that not only do they smell nice, but they are thin, thin, thin! Carrying one in my back pocket is like not having a wallet at all, even stuffed with bills to go to the Farmer's Market.
A friend is having a craft show in her home, and I'll be selling plate flowers. But I want to make some crazy stuff to give more variety and a market feeling. Last year I sold mushroom ornaments and fabric brooches in addition. May do that again too.
Any one else making crafts to sell?
Kathy
Tuesday, October 23, 2012
OVERKILL on Protection?
Am I the only one who seldom posts on blogs anymore because for so many you have to type two hard to read "words"? Sometimes it is simple and obvious, but some are just terrible. I tried 3 times the other day on one blog and finally gave up.
I guess I better check my own settings...
Let me know what you think.
Kathy
I guess I better check my own settings...
Let me know what you think.
Kathy
Sunday, September 30, 2012
Refashions: stripey tank & shorts to shirt
I've been sewing lately. Here's a couple of more or less successful refashions. Let me know what you think, especially about the skirt which I have mixed feelings about. Sorry I can't find the before pictures.
I bought this stripey top at a TS from the 25 Cent rack. I knew it would be too long, but I'd been wanting to do some form of the ruffles on striped tops that I've seen others do.
Here's how it ended up:

Or it could be worn like this:

How I did it: I marked the length I wanted with a pin and cut it so I would have enough for a nice hem. Zig zagged the raw edge of the shirt then hemmed.
Then I took the piece I cut off, zigged the cut edge, made 2 lines of wide stitches along the cut edge and pulled the top threads to gather. Then I had to hand sew to gather more!

Finally I got it as small as the center would go. I looked for a button or some thing to cover the gathered\cut edge center, but didn't like anything big enough that I liked. So I made a little yo yo from a circle of b&w fabric and put a small button that I liked in the middle and sewed them in the middle of the large floppy piece.

I decided that the big flower/ruffle should be washed separately so I attached it with snaps, one on each side of the neck edging. I had planned on putting one in the middle as well.
You know what? I hate sewing on snaps. So I only did the 2 and attached the top middle with a safety pin. Removing the safety pin allowed me to do the flop over alternate look too.

OK the shorts. I bought them on sale a long time ago, but have never worn them They were supposedly talls, but actually the back rise was not long enough.
I wanted to do something else, quickly. I used my seam ripper to take out the inside seams.
I was nervous about the measuring so I used a skirt that fits to make sure.

Well unfortunately the sewing wasn't as simple as I thought because the seams have top stitching. So I had to tear apart my first attempt at a new front seam, and redo it with by creating a top seam with the iron, front and back. See the top stitched seam bumpily disappearing into my regular seam?

Plus the seams had turned out really off.

So I was glad to rip it out and do it over. One of the cats and the dog both helped:

I used the iron to get the front and back seams how I wanted. I had to go right up to the zipper in the front. Then I top stitched.
I also tightened up the waist by putting elastic in the back (more zig zagging):
I measured on the outside then pinned the elastic on the inside on either side of the back middle to avoid the belt loop, stretched and zig zagged out form the middle twice on both sides. I like the waist being more snug.
What do you think of the skirt? The cotton is lovely and soft. I'm more likely to wear it than the ill-fitting shorts, but I'm not sure how I feel about it!

Thanks for looking.
Kathy
I'm linking up to Motivate Me Monday at Keeping it Simple. and the Made With Love Link Party at Sew Chatty . Check out the fun ideas and crafts!
I bought this stripey top at a TS from the 25 Cent rack. I knew it would be too long, but I'd been wanting to do some form of the ruffles on striped tops that I've seen others do.
Here's how it ended up:
Or it could be worn like this:
How I did it: I marked the length I wanted with a pin and cut it so I would have enough for a nice hem. Zig zagged the raw edge of the shirt then hemmed.
Then I took the piece I cut off, zigged the cut edge, made 2 lines of wide stitches along the cut edge and pulled the top threads to gather. Then I had to hand sew to gather more!
Finally I got it as small as the center would go. I looked for a button or some thing to cover the gathered\cut edge center, but didn't like anything big enough that I liked. So I made a little yo yo from a circle of b&w fabric and put a small button that I liked in the middle and sewed them in the middle of the large floppy piece.
I decided that the big flower/ruffle should be washed separately so I attached it with snaps, one on each side of the neck edging. I had planned on putting one in the middle as well.
You know what? I hate sewing on snaps. So I only did the 2 and attached the top middle with a safety pin. Removing the safety pin allowed me to do the flop over alternate look too.
OK the shorts. I bought them on sale a long time ago, but have never worn them They were supposedly talls, but actually the back rise was not long enough.
I wanted to do something else, quickly. I used my seam ripper to take out the inside seams.
I was nervous about the measuring so I used a skirt that fits to make sure.
Well unfortunately the sewing wasn't as simple as I thought because the seams have top stitching. So I had to tear apart my first attempt at a new front seam, and redo it with by creating a top seam with the iron, front and back. See the top stitched seam bumpily disappearing into my regular seam?
Plus the seams had turned out really off.
So I was glad to rip it out and do it over. One of the cats and the dog both helped:
I used the iron to get the front and back seams how I wanted. I had to go right up to the zipper in the front. Then I top stitched.
I also tightened up the waist by putting elastic in the back (more zig zagging):
I measured on the outside then pinned the elastic on the inside on either side of the back middle to avoid the belt loop, stretched and zig zagged out form the middle twice on both sides. I like the waist being more snug.
What do you think of the skirt? The cotton is lovely and soft. I'm more likely to wear it than the ill-fitting shorts, but I'm not sure how I feel about it!
Thanks for looking.
Kathy
I'm linking up to Motivate Me Monday at Keeping it Simple. and the Made With Love Link Party at Sew Chatty . Check out the fun ideas and crafts!
Wednesday, September 5, 2012
My first Men's Shirt Refashion
I've been wanting to refashion men's shirts for some time. I have some very pretty ones that I just can't bring myself to cut into. So I got this one as a practice shirt for a couple dollars at the local thrift store.

Yikes my hands look like I'm a ghoul. See what happens if you don't have a dishwasher! Anyway the problem with a practice shirt is its not very inspiring.
I cut off the collar, making a scoop neck, and took it in at the bust. I tried to put darts 3 times but it never came out right, so I gave up and took in the shoulders at the top to make the armholes smaller. Then I cut smaller armholes out of the sleeves, and cut off the cuffs.
Here it is with the neckline unscooped because I raised the shoulders.

I thought about leaving it long as a tunic, but it looks like scrubs to me. So I cut it short.

I cut the sleeves to 3/4 length, and the button worked out perfectly.


I think its ok, but I don't love it. I'm going to do the next one with the buttons down the front.
Thanks for looking.
Kathy
Yikes my hands look like I'm a ghoul. See what happens if you don't have a dishwasher! Anyway the problem with a practice shirt is its not very inspiring.
I cut off the collar, making a scoop neck, and took it in at the bust. I tried to put darts 3 times but it never came out right, so I gave up and took in the shoulders at the top to make the armholes smaller. Then I cut smaller armholes out of the sleeves, and cut off the cuffs.
Here it is with the neckline unscooped because I raised the shoulders.
I thought about leaving it long as a tunic, but it looks like scrubs to me. So I cut it short.
I cut the sleeves to 3/4 length, and the button worked out perfectly.
I think its ok, but I don't love it. I'm going to do the next one with the buttons down the front.
Thanks for looking.
Kathy
Thursday, August 2, 2012
Quick skirt refashion - adding length.
I need skirts to wear to work. I am 5'9" tall and its very hard to find pants to fit me. I won't go into details.
This skirt was the exact wrong length. Since I am no longer young, just cutting off some length and making it into a cute above the knee was not an option. So I used my 50% off coupon and bought some dark blue blanket binding.

Quick and easy, though perhaps not the most elegant!
Kathy
This skirt was the exact wrong length. Since I am no longer young, just cutting off some length and making it into a cute above the knee was not an option. So I used my 50% off coupon and bought some dark blue blanket binding.
Quick and easy, though perhaps not the most elegant!
Kathy
Sorry about plate flower troubles!
To the person who had trouble with their plate flowers. I am so sorry! I have had some recently made ones fall apart lately too. I don't know if GE changed their formula for Silicone II for windows and doors (clear) or if I got a bad tube. You do have to look carefully at the date because once its outdated it won't work for plate flowers.
I'm going to be experimenting through the summer and will see what lasts over the winter and let you know what is working.
Kathy
I'm going to be experimenting through the summer and will see what lasts over the winter and let you know what is working.
Kathy
Saturday, June 2, 2012
Things that give me the blues...
These tiles are going on the back of a piano that is one of 50 decorated pianos that will be put outdoors in the area that I live for the month of July for people to play on. My friend Susan masterminded the submitted and was chosen for her Blues piano concept piano and part of it was she asked people to make these squares for the back. She asked us to turn something that makes us blue into art or just do something blue.
These are my first ones:
Death (with a moveable deaths head), mosquito, my heart, and gravity (2 filler tiles not named.)
Today we finished the piano. I'll post more pics later with some of the others. Lots of amazing artwork!
 Other than that I've been gardening.
Thanks for looking.
Kathy
Other than that I've been gardening.
Thanks for looking.
Kathy
Other than that I've been gardening.
Thanks for looking.
Kathy
Sunday, April 29, 2012
Shoe Refashion
I thrifted these shoes some time ago. They are very very comfortable with the perfect size heel for me. Plus its hard to find size 10's used in good condition. But I never wore them because I don't really like the look. I only have one for the before pic because I'd already started working on the other shoe before I remembered to take a before pic.
 Inspiration: Somewhere on the internet I saw some heels with realistic pansies fabric on them. I really like them and they were very expensive. Can't find them now of course.
I looked at tutorials on how to glue fabric on shoes. Here is one. Tho next time I will do it more like this one from Burda. I love the idea of making a plain cloth pattern and then having a perfect fit including being able to sew a small hem for the bottom where the fabric meets the sole. Unfortunately I couldn't find my tacky removable spray adhesive, so I just winged it making patterns from tissue then newspaper.
Inspiration: Somewhere on the internet I saw some heels with realistic pansies fabric on them. I really like them and they were very expensive. Can't find them now of course.
I looked at tutorials on how to glue fabric on shoes. Here is one. Tho next time I will do it more like this one from Burda. I love the idea of making a plain cloth pattern and then having a perfect fit including being able to sew a small hem for the bottom where the fabric meets the sole. Unfortunately I couldn't find my tacky removable spray adhesive, so I just winged it making patterns from tissue then newspaper.
 Once I had a pattern for the fronts, I more or less centered a pansy on the toe. I also chose to cut more or less on the bias, not sure what difference that made here. BTW, label your patterns. You can flip them over and you have the pattern for the other shoe. When I glued with Aleen's Fabric Fushion I used a brush mostly but occassionally my fingers. First I brushed it on the shoe on the front of the vamp, except near the sole where I planned to turn the fabric under. I glued the Pansy down first working out and up so at least the pansy was smooth and complete, turning clipped fabric to the inside.
 I did turn the fabric under about 1/4 inch where it meets the sole. If I do another pair, I think I will make the fabric pattern first. But I'm still happy with how they turned out.

 I think I will probably spray them with Krylon crystal clear (stuffing the shoe with paper so the spray doesn't go inside.) But I haven't totally decided yet.
 I can't wait to wear them!
What do you think?
TFL
Kathy
ps I also posted at the Refashion Coop (tho a shorter post). But if you like refashioning check it out! there are so many talented people there.
I have linked up to Restyled Sunday, Sunday Showoff at Twigg Studios, Marchia's "Minutes for Me" Linky Party and Thrifty Things Friday at The Thrifty Groove. Check out the fabulous projects there!
I can't wait to wear them!
What do you think?
TFL
Kathy
ps I also posted at the Refashion Coop (tho a shorter post). But if you like refashioning check it out! there are so many talented people there.
I have linked up to Restyled Sunday, Sunday Showoff at Twigg Studios, Marchia's "Minutes for Me" Linky Party and Thrifty Things Friday at The Thrifty Groove. Check out the fabulous projects there!
Inspiration: Somewhere on the internet I saw some heels with realistic pansies fabric on them. I really like them and they were very expensive. Can't find them now of course.
I looked at tutorials on how to glue fabric on shoes. Here is one. Tho next time I will do it more like this one from Burda. I love the idea of making a plain cloth pattern and then having a perfect fit including being able to sew a small hem for the bottom where the fabric meets the sole. Unfortunately I couldn't find my tacky removable spray adhesive, so I just winged it making patterns from tissue then newspaper.
Once I had a pattern for the fronts, I more or less centered a pansy on the toe. I also chose to cut more or less on the bias, not sure what difference that made here. BTW, label your patterns. You can flip them over and you have the pattern for the other shoe. When I glued with Aleen's Fabric Fushion I used a brush mostly but occassionally my fingers. First I brushed it on the shoe on the front of the vamp, except near the sole where I planned to turn the fabric under. I glued the Pansy down first working out and up so at least the pansy was smooth and complete, turning clipped fabric to the inside.
I did turn the fabric under about 1/4 inch where it meets the sole. If I do another pair, I think I will make the fabric pattern first. But I'm still happy with how they turned out.
I think I will probably spray them with Krylon crystal clear (stuffing the shoe with paper so the spray doesn't go inside.) But I haven't totally decided yet.
I can't wait to wear them!
What do you think?
TFL
Kathy
ps I also posted at the Refashion Coop (tho a shorter post). But if you like refashioning check it out! there are so many talented people there.
I have linked up to Restyled Sunday, Sunday Showoff at Twigg Studios, Marchia's "Minutes for Me" Linky Party and Thrifty Things Friday at The Thrifty Groove. Check out the fabulous projects there!
Sunday, April 15, 2012
April Flowers
Lots of blooms and already quite a few gone by, such as the witch hazel, many of the crocus, and the daphne mzerum. I've been uncovering gardens and weeding. Not a lot of time for inside crafting. I have made some false starts at refashioning some clothes. Hopefully will finish at least one this afternoon!
Now the flowers (I wrote the descriptions underneath the pics):

Still a few crocus left shown here with frost:

Lots of Bloodroot, a native wildflower, everywhere. I love it!

Then there is the double Bloodroot. Only one little clump so far. I hope it spreads like the other.

This is a bulb, Chionodoxa. Glory of the snow. It is everywhere too, a beautiful blue.

These miniature daffodil bulbs that I planted a couple of years ago have been a bit of a disappointment. Not very many blooms. But I noticed my regular daffs don't have many flower buds either this year.

And here is a cultivar of the wild Rue anenome. This one is double and pink.

I have just 2 left of my clump of early tulips. When dh dug up around the foundation to insulate, most the bulbs were lost.

And of course scilla with a hyacinth coming up in the middle.

Here is a hyacinth all the way up.

The Lenten roses are blooming.

Close up of the flower.

And my white one.

Last but not least, the Star Magnolia has burst into bloom. Some of the flowers are a little brown because we had two hard frosts since they opened.
TFL
Kathy
Now the flowers (I wrote the descriptions underneath the pics):

Still a few crocus left shown here with frost:

Lots of Bloodroot, a native wildflower, everywhere. I love it!

Then there is the double Bloodroot. Only one little clump so far. I hope it spreads like the other.

This is a bulb, Chionodoxa. Glory of the snow. It is everywhere too, a beautiful blue.

These miniature daffodil bulbs that I planted a couple of years ago have been a bit of a disappointment. Not very many blooms. But I noticed my regular daffs don't have many flower buds either this year.

And here is a cultivar of the wild Rue anenome. This one is double and pink.

I have just 2 left of my clump of early tulips. When dh dug up around the foundation to insulate, most the bulbs were lost.

And of course scilla with a hyacinth coming up in the middle.

Here is a hyacinth all the way up.

The Lenten roses are blooming.

Close up of the flower.

And my white one.

Last but not least, the Star Magnolia has burst into bloom. Some of the flowers are a little brown because we had two hard frosts since they opened.
TFL
Kathy
Subscribe to:
Posts (Atom)


