Monday, May 31, 2010

Memorial Day: Remembering Uncle Arthur

 
This is a picture of my Great Uncle George's Uncle Arthur. When Uncle George got old (95) he started giving me photos. Previously he had given me some to scan and return. He died right before his 96th birthday, and when I put together some commorative pages including his own service in WWII, I put together this page about Great Great Uncle Arthur who served and died in "The Great War".

No one who knew Uncle Arthur is living today. I only know he was one of my Great Grandfather's brothers. "Enlisted May 24, 1918 Died September 21, 1918" was on the back of the photo.
Uncle Arthur

Thank you Uncle Arthur, and the other "boys" from my hometown in the big photo, and to our servicemen and women everywhere and when.
Posted by Picasa

Tuesday, May 25, 2010

Concrete (table) 'n primroses

I made this:
Photobucket

Using this plastic bird bath I got at a yard sale for $1 as a mold:
Photobucket

I plan to mosaic the top, but for now its on the edge of my lawn.
Photobucket

And here are the primroses growing nearby:
2010

Check out Bobbypin Boardwalks Bragfest #10 and Whatever Goes Wednesday at Someday Crafts to see lots of other projects; and look at the Yard Art on Thursday at Work of the Poet!

Kathy

Thursday, May 20, 2010

Yard Art Thursday! Jester from Costa Rica

I'm on the late side for Yard Art Thursday at Work of the Poet. Check out the other yard art there!

I was feeling nostalgic for our trip to Costa Rica in 2007. I'm trying to learn Spanish and I wish I could go back!

We loved Costa Rica. It has been a democracy for a long time and all the children go to school. And they like USers! Its more expensive than say, Mexico, but a society that sends its kids to school costs more. young people go to college to become guides in the rain forest and cloud forests and are very knowledgable.

Junk man in Costa Rica

The jester in this picture was in front of a bar in Santa Elena, a town up by the cloud forest. The bar was closed which is why he is behind a fence. There is almost no violent crime in CR, but a lot of theft.

I wish I had the talent to make him!

Enjoy,
Kathy

Saturday, May 15, 2010

Tutorial for Plant label signs Part 2 of 2

Hello! Welcome back.

I'm linking to Lit & Laundry's Finished for Friday again. There are more cool projects there since yesterday, have a look!

Today I will tell you about the letters and variations and alternatives that I have considered. See yesterday’s post for how to make and install the sign and post.

First I am going to tell you what I did, then I’ll mention a few other options. I'm considering yet another post on other label ideas, cuz I did come up with quite a few on the road to making these. Seems a shame to waste all my research.

Don't be disappointed if you don't have the equipment to do exactly what I did, i suggest some other possibilities at the end of this tutorial.

Here is a closeup of one of the ones I made for the gardens at the local shelter:

Photobucket

For the common name, I cut vinyl letters on my Graftec Robo cutter from outdoor rated vinyl sticker material. If you have a Wishblade or a Cricut, or another cutting machine, you can do the same. They are mostly just under 1 inch tall. The whole word just under 4.5 inches long or less worked best. This particular one, Lilac, was such a short word that I made the letters a bit bigger. I believe you can buy vinyl letter stickers that are for outdoors at the hardware store if you can’t make your own. I doubt the scrapbooking kind would hold up, but don’t know really.

Look closely and you can see where I filled the screw holes.

To print the scientific name and some information about the plant, I used CLEAR Avery LASER labels (Not Inkjet! Inkjet quickly fades.) I have read that the laser labels last for years in the garden. I only had time to test it for 2 weeks in my garden, but we did have rain and snow! If you don’t have a laser printer, you can set your words up on the template in Word, then go to a copy shop and have them laser print your file onto the labels.

How to find the template and fill it out:The template was in Word under Tools/ Letters & Mailing/ Envelopes and Labels/ Choose labels, then go to Options select the template, which is the brand and size. What you should see is the set up for a whole page of labels that you can type in and save. Avery 5163 is what I used. The front of the package will have the template name. By the way my pack of 10 sheets of ten 2” x 4” labels cost about $11.00. Eleven cents each. Once you have the template you can type what ever you want into each spot. I left some space around all edges, and I printed on plain paper before using the labels to make sure it would fit right. I had to fiddle a bit and edit to get the words to fit well. I really had to fiddle to get 8 point blank lines at the top (and the bottom.) Notice that I do have room top bottom and sides. They may not print well if too close to the edges.

Applying the letters and stickers:I put the plate on my knees so that the elbow was between and applied the stickers. I'm amazed that I didn't accidentally apply any of them upside down. Just be careful to have the plate right side up facing you. As I've mentioned I had to wipe powdery paint residue off with a rag first. (I did them all at once before this stage.) In a couple of cases I had to spray paint lightly again. Once the stickers were in place, I smoothed the letters and labels firmly with my pampered chef plastic scraper.

Here they all are (I made 24 with words and 2 blanks):

Photobucket


Other possibilities:
* If you prefer, you can write directly on the sign with a paint pen. (Sharpie will not last!)
* My back up plan, if the letters or stickers get vandalized, is to use my cutting machine to cut a stencil and spay paint the info. I couldn’t be as detailed, but it would be more permanent.
*A purchased letter stencil could be used, especially for the large common name. Outline the letters in paint pen then fill in.
* I considered just cutting the post at a 45 degree angle and attaching the switch plate directly to it. But this has 2 problems: 1. how to pound it into the ground and 2. if the switch plate falls off there is a sharp spear like stick reinforced with rebar pointing upward. Yikes! I don't think so.

For my garden, I may use the spoon attachment method invented by Gardencraze/Carmen of the Gardenjunk forum for hanging plate flowers. Below is a pic. The handle of the flattened spoon slides into the pipe. Not all spoons flatten easily and some handles are too big for the pipe, so choose with care if you try this. Forks and cake servers also work. They would be very easily walked away with tho, so I wouldn't do this in a public area. A great thing about the spoon (or fork) method is that you can hang things on trellis, fences or other things.

Photobucket

This is a round metal switchplate. Neat looking but they cost $2.49 each and are not really any bigger than the oversized singles. In the back ground I put one I made with painted pvc pipe and written with a silver paint pen (no P. Denticulatas in the pic, by the way.) I also plan to experiment with plastic switch plates because you can get big ones. I don't think they will last the winter but you never know!

Good luck and have fun. Please let me know if you make some! I’d love to link to you or feature your results.

Kathy

PS I'm repeating my Disclaimer, and adding that I live in New Hampshire, Zone 4: This project is experimental in that I haven't tested it in my garden for a full years weather. I have experience making things that stay out in the garden all year and have used that knowledge to design these. But only time will really tell.

Thursday, May 13, 2010

Tutorial for Plant label signs Part 1 of 2

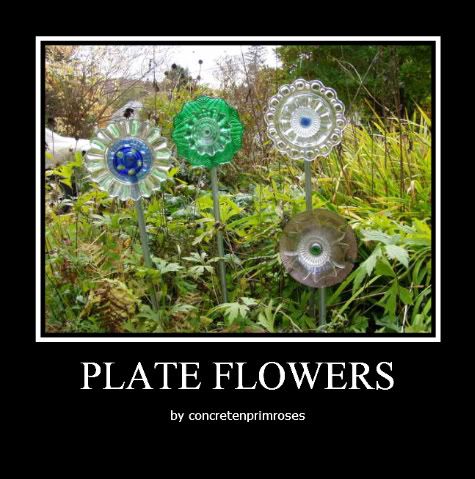
Hello! I'm linking up to Lit and Laundry's Finished for Friday!
Check out the other great projects there!

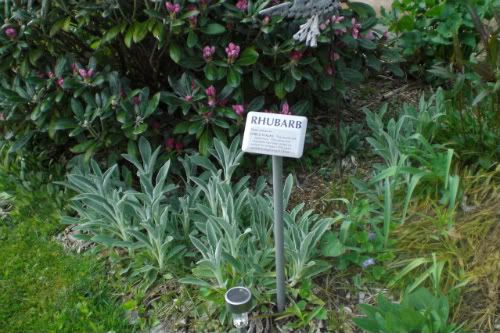
Here is a photo of one of the plant labels that I made for the gardens at the local shelter. I know I know there is no rhubarb in the pic. I just stuck it in my garden and took a picture to show you! I made 26 total.

Photobucket

Today, Part One: the signs.
Tomorrow Part Two: the letters, and some variations on the theme.

Disclaimer: This project is experimental in that I haven't tested it in my garden for a full years weather. I have experience making things that stay out in the garden all year and have used that knowledge to design these. But only time will really tell.

My Charge: To find attractive plant labels with room to write educational information.

Why I chose this style: 1) Relatively inexpensive, large, good looking plant markers don’t exist to purchase. 2) There are testimonials that Avery LASER printed (not inkjet) labels last for many years in the garden through northern winter conditions. 3) Pieces of metal such as stainless steel or aluminium tags are expensive. 4) I have a cutting machine and some outdoor rated vinyl for letters. 5) The shelter committee chose this style from the options that I came up with.

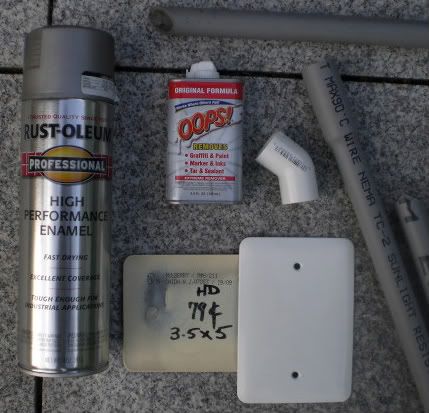
Materials: Metal rounded corner BLANK switch plates ($0.79 at HD, it is the oversized one); sandable, paintable epoxy to fill the screw holes (I used green log, as seen on tv); ½ inch 45 degree PVC elbows ($0.50 at HD. (make sure you get 45 degree elbows, they hold the plate at the perfect angle); rust inhibiting spray paint for the switch plates (I chose silver cuz I wanted to mimic zinc markers or yore and I knew black letters would show up. Consider what color words you will have when you choose your color); ½ inch PVC electricians conduit (because it is already gray so I didn’t have to paint it); rebar; Automotive goop; Oops gunk remover to wipe the words off the conduit. Note: Some brands of elbow don’t fit on the electricial conduit. Take an elbow over to it and test. While you are at it, make sure that rebar will fit inside the pvc also. It is fine to use regular pvc pipe. I wanted to avoid painting since I was making so many.
CAUTION: Make outside if you can. Paint, goop, and Oops are all smelly and bad to inhale. Sorry I couldn't find the Automotive goop or my epoxy for this photo.

Photobucket

Step One: Fill the screw holes on the switch plate. Since it is a blank, the only holes are the screw holes! Sand around the holes, then I used 2 part epoxy putty. An outdoor rated sandable paintable caulk might work. Let harden then sand whole face in prep for painting.

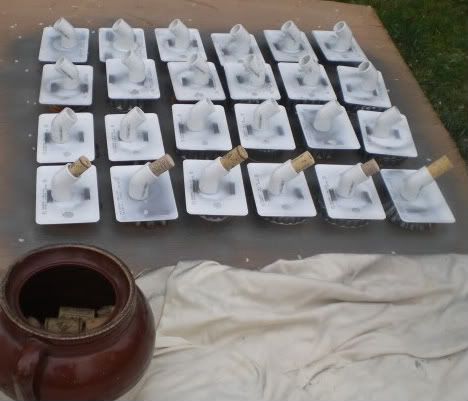
Step 2: Spray paint top of switchplates. I set them on little flower pots to make sure that I got the edges. Let dry and give another coat. I chose Rust-oleum Professional High Performance Enamel but it left a funny powdery residue which I scrubbed off with a rag. Otherwise the stickers wouldn't have stuck. Not sure I would buy this particular paint again for this purpose. The switchplates are cheap metal, so you want to make sure you use rustoleum or another rust inhibiting paint.

Step 3: Attach elbows to backs of switchplates. Put a nice thick bead of automotive goop on one end of the elbow (a circle). Now stick it to the back of the plate where you want it (in the middle, slightly high). Now right away - Pull apart! Yup that's right. Now you have goop on both pieces. Keep separate and allow to cure for 3 to 10 minutes, then press together again. Hold tightly in place for a few seconds. Set them where they won’t be disturbed and let cure over night. I was very carefully doing 24, so when I had finished the gooping, the first ones had cured enough so I just went on and stuck them together. BTW, I measured when I did the 2 preliminary ones. When I did 24 at a time, I eyeballed it. Take your time with this part. This connection is the weak link and you want it to be done right.

Step 4: Next day, paint the back side and elbow. I set each plate on something again. When I just did two I stuffed some newspaper into the elbow so paint wouldn’t go inside, but that took too long when I was painting 24, so I put a cork into each one before I painted. Spray, let dry, spray again. If you use silver, the automotive goop seam will look like you soldered it. Now the plate part is complete (except for words, that’s tomorrows tute). Its important not to get paint inside because the elbow might not fit over the post.

Photobucket

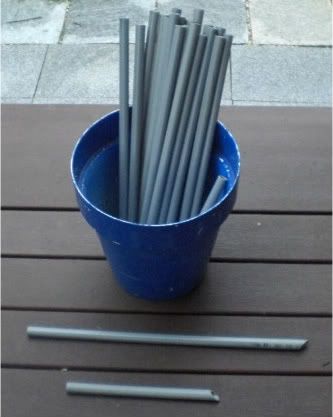
Step 5: Make the posts. Cut the pvc pipe or conduit into the lengths that you want. Remember that 4 to 6 inches or more will go into the ground. Most of them were for shrubs so we chose 2 feet. I cut 4 foot lengths then cut in half at a 45 angle to make a slightly pointy end that will go more easily into the ground. I also did some 1 footers, for the strawberries. The problem with the electrical conduit is it has a funny wide thing at the top, so there may be some waste, but at $0.82 for 10 feet, its ok. Once cut, I held the pointy end in my hand and wiped the black letters of the pipe with Oops. The pointy end will go underground so no need to wipe it off. (BTW: Neither paint thinner nor nail polish remover worked.) The first ones that I made were regular pvc pipe that I painted. But paint interferes with how the elbow fits and you have to be careful. I just didn’t have time to be careful. But for home I may make some brown ones.

Photobucket

Installation: (Normally after the letters are applied). Pound a piece of rebar into the ground, for my 2 foot posts, I used 2 foot rebar. For the 1 foot post, 1 foot rebar. I used a small sledge hammer, tho a regular hammer will work. I tried to pound the rebar half way, but it didn't always work, so in some cases it "fills" the post. Pound the post over it to the height you want. Carefully push and twist the elbow onto the installed post. Hold the elbow not the switch plate!!! The elbow to switchplate seam is the weak link. Do not pound on the switchplate.
It was pouring rain when I put them in. I will probably go back and add a bit of GE silicone II for windows and doors, clear to the seam where the elbow and post overlap. Just as a precaution.

The switchplate is at a nice readable 45 degree angle. And water will run off it.

By the way, they still were not "cheap". I estimate that they cost $4.00 each plus labor. So to make them for the shelter cost a bit over $100.

Come back tomorrow and I’ll tell you how I made the words, as well as some other options.

Thanks so much for visiting. Please leave a comment so I know you have been here. And absolutely let me know if you try this, and if you make any improvements or interesting variations.

Have fun!

Kathy

Thursday, May 6, 2010

Mosaic done and plant label preview

Check out Lit and Laundry's Finished for Friday to see other projects!

I grouted the mosaic that I made in a class: Charcoal grout. Dh made the frame for me out of left over porch skirt spindles.
Photobucket

And here is a preliminary pic of some plant labels I'm making for the landscape project at a local shelter. I'll do a tutorial when I'm done making them. (all 26 with stakes!)

Photobucket


Thanks for looking!