Tuesday, November 20, 2012

Coffee bag wallets

I know these have been around for a while, but I had all these coffee bags that I didn't want to throw away.
And I discovered that not only do they smell nice, but they are thin, thin, thin!  Carrying one in my back pocket is like not having a wallet at all, even stuffed with bills to go to the Farmer's Market.

CIMG2717

A friend is having a craft show in her home, and I'll be selling plate flowers.  But I want to make some crazy stuff to give more variety and a market feeling.  Last year I sold mushroom ornaments and fabric brooches in addition.  May do that again too.

Any one else making crafts to sell?

Kathy

Tuesday, October 23, 2012

OVERKILL on Protection?

Am I the only one who seldom posts on blogs anymore because for so many you have to type two hard to read "words"?  Sometimes it is simple and obvious, but some are just terrible.  I tried 3 times the other day on one blog and finally gave up.
I guess I better check my own settings...
Let me know what you think.
Kathy

Sunday, September 30, 2012

Refashions: stripey tank & shorts to shirt

I've been sewing lately.  Here's a couple of more or less successful refashions.  Let me know what you think, especially about the skirt which I have mixed feelings about.  Sorry I can't find the before pictures.

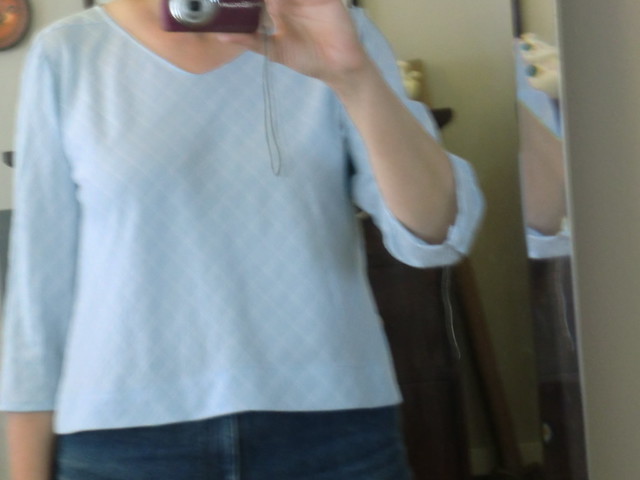
I bought this stripey top at a TS from the 25 Cent rack.  I knew it would be too long, but I'd been wanting to do some form of the ruffles on striped tops that I've seen others do.

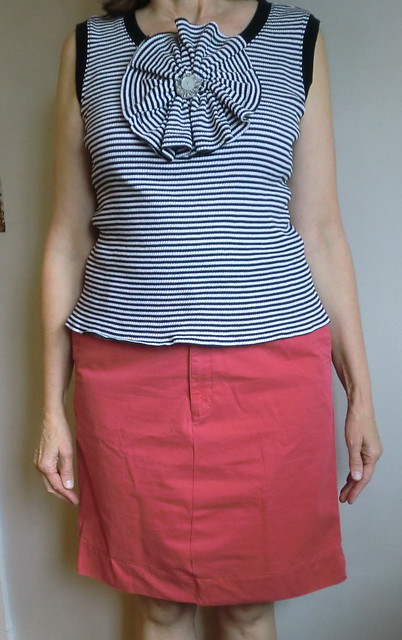
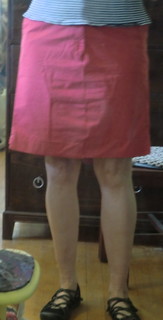
Here's how it ended up:
CIMG2675 

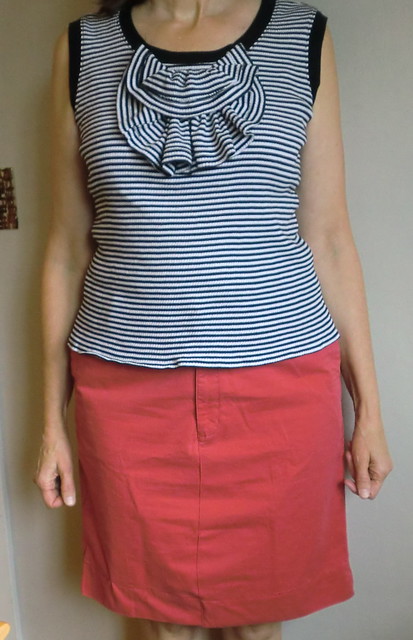
Or it could be worn like this:
CIMG2673

How I did it:  I marked the length I wanted with a pin and cut it so I would have enough for a nice hem.  Zig zagged the raw edge of the shirt then hemmed.

Then I took the piece I cut off, zigged the cut edge, made 2 lines of wide stitches along the cut edge and pulled the top threads to gather.  Then I had to hand sew to gather more!
 CIMG2655

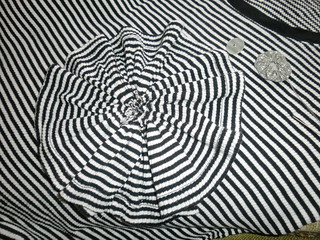
Finally I got it as small as the center would go.  I looked for a button or some thing to cover the gathered\cut edge center, but didn't like anything big enough that I liked.  So I made a little yo yo from a circle of  b&w fabric and put a small button that I liked in the middle and sewed them in the middle of the large floppy piece. 
CIMG2656

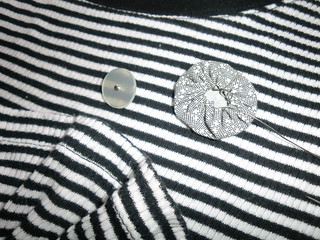
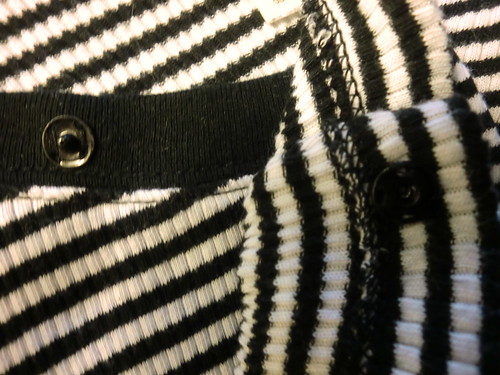
I decided that the big flower/ruffle should be washed separately so I attached it with snaps, one on each side of the neck edging.  I had planned on putting one in the middle as well.
You know what?  I hate sewing on snaps.  So I only did the 2 and attached the top middle with a safety pin.  Removing the safety pin allowed me to do the flop over alternate look too.

CIMG2677

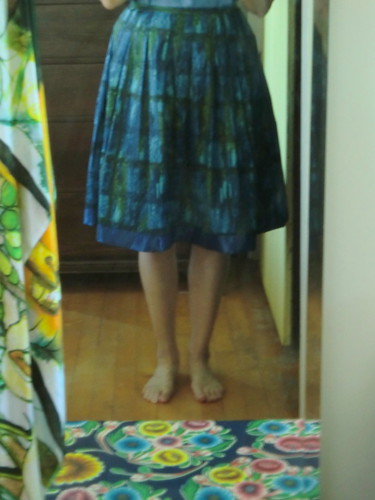
OK the shorts.  I bought them on sale a long time ago, but have never worn them  They were supposedly talls, but actually the back rise was not long enough.

I wanted to do something else, quickly. I used my seam ripper to take out the inside seams.
I was nervous about the measuring so I used a skirt that fits to make sure. 
CIMG2658

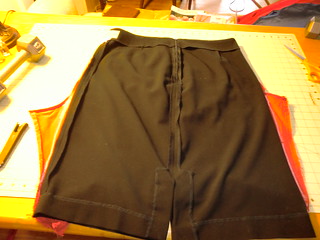
Well unfortunately the sewing wasn't as simple as I thought because the seams have top stitching. So I had to tear apart my first attempt at a new front seam, and redo it with by creating a top seam with the iron, front and back.  See the top stitched seam bumpily disappearing into my regular seam?
CIMG2659
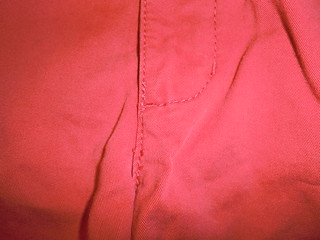
Plus the seams had turned out really off. 
CIMG2660
So I was glad to rip it out and do it over.  One of the cats and the dog both helped:
CIMG2661
I used the iron to get the front and back seams how I wanted.  I had to go right up to the zipper in the front.  Then I top stitched.
I also tightened up the waist by putting elastic in the back (more zig zagging):
I measured on the outside then pinned the elastic on the inside on either side of the back middle to avoid the belt loop, stretched and zig zagged out form the middle twice on both sides.  I like the waist being more snug.
What do you think of the skirt?  The cotton is lovely and soft.   I'm more likely to wear it than the ill-fitting shorts, but I'm not sure how I feel about it!
CIMG2676

Thanks for looking.

Kathy

I'm linking up to Motivate Me Monday at Keeping it Simple.  and the Made With Love Link Party at Sew Chatty .   Check out the fun ideas and crafts!


Wednesday, September 5, 2012

My first Men's Shirt Refashion

I've been wanting to refashion men's shirts for some time.  I have some very pretty ones that I just can't bring myself to cut into.  So I got this one as a practice shirt for a couple dollars at the local thrift store.

Men's shirt refashion - before

 Yikes my hands look like I'm a ghoul.  See what happens if you don't have a dishwasher!  Anyway the problem with a practice shirt is its not very inspiring. 

I cut off the collar, making a scoop neck, and took it in at the bust.  I tried to put darts 3 times but it never came out right, so I gave up and took in the shoulders at the top to make the armholes smaller.  Then I cut smaller armholes out of the sleeves, and cut off the cuffs.

Here it is with the neckline unscooped because I raised the shoulders. 

Men's shirt refashion - mid stream

I thought about leaving it long as a tunic, but it looks like scrubs to me.  So I cut it short.

Men's shirt refashion - complete


I cut the sleeves to 3/4 length, and the button worked out perfectly.

CIMG2575


Men's shirt refashion - complete

I think its ok, but I don't love it.  I'm going to do the next one with the buttons down the front.

Thanks for looking.

Kathy

Thursday, August 2, 2012

Quick skirt refashion - adding length.

I need skirts to wear to work.  I am 5'9" tall and its very hard to find pants to fit me.  I won't go into details.

This skirt was the exact wrong length.  Since I am no longer young, just cutting off some length and making it into a cute above the knee was not an option.  So I used my 50% off coupon and bought some dark blue blanket binding. 

CIMG2333

Quick and easy, though perhaps not the most elegant!

Kathy

Sorry about plate flower troubles!

To the person who had trouble with their plate flowers.  I am so sorry!  I have had some recently made ones fall apart lately too.  I don't know if GE changed their formula for Silicone II for windows and doors (clear) or if I got a bad tube.   You do have to look carefully at the date because once its outdated it won't work for plate flowers.
I'm going to be experimenting through the summer and will see what lasts over the winter and let you know what is working. 

Kathy

Saturday, June 2, 2012

Things that give me the blues...

These tiles are going on the back of a piano that is one of 50 decorated pianos that will be put outdoors in the area that I live for the month of July for people to play on. My friend Susan masterminded the submitted and was chosen for her Blues piano concept piano and part of it was she asked people to make these squares for the back. She asked us to turn something that makes us blue into art or just do something blue. These are my first ones: Death (with a moveable deaths head), mosquito, my heart, and gravity (2 filler tiles not named.) Today we finished the piano. I'll post more pics later with some of the others. Lots of amazing artwork! CIMG2317 Other than that I've been gardening. Thanks for looking. Kathy

Sunday, April 29, 2012

Shoe Refashion

I thrifted these shoes some time ago. They are very very comfortable with the perfect size heel for me. Plus its hard to find size 10's used in good condition. But I never wore them because I don't really like the look. I only have one for the before pic because I'd already started working on the other shoe before I remembered to take a before pic. Shoe before refashion Inspiration: Somewhere on the internet I saw some heels with realistic pansies fabric on them. I really like them and they were very expensive. Can't find them now of course. I looked at tutorials on how to glue fabric on shoes. Here is one. Tho next time I will do it more like this one from Burda. I love the idea of making a plain cloth pattern and then having a perfect fit including being able to sew a small hem for the bottom where the fabric meets the sole. Unfortunately I couldn't find my tacky removable spray adhesive, so I just winged it making patterns from tissue then newspaper. Shoe before and vamp pattern Once I had a pattern for the fronts, I more or less centered a pansy on the toe. I also chose to cut more or less on the bias, not sure what difference that made here. BTW, label your patterns. You can flip them over and you have the pattern for the other shoe. When I glued with Aleen's Fabric Fushion I used a brush mostly but occassionally my fingers. First I brushed it on the shoe on the front of the vamp, except near the sole where I planned to turn the fabric under. I glued the Pansy down first working out and up so at least the pansy was smooth and complete, turning clipped fabric to the inside. Glueing the pansy on toe first I did turn the fabric under about 1/4 inch where it meets the sole. If I do another pair, I think I will make the fabric pattern first. But I'm still happy with how they turned out. Refashioned shoes Refashioned pansy shoes I think I will probably spray them with Krylon crystal clear (stuffing the shoe with paper so the spray doesn't go inside.) But I haven't totally decided yet. Pansy fabric shoe refashion I can't wait to wear them! What do you think? TFL Kathy ps I also posted at the Refashion Coop (tho a shorter post). But if you like refashioning check it out! there are so many talented people there. I have linked up to Restyled Sunday, Sunday Showoff at Twigg Studios, Marchia's "Minutes for Me" Linky Party and Thrifty Things Friday at The Thrifty Groove. Check out the fabulous projects there!

Sunday, April 15, 2012

April Flowers

Lots of blooms and already quite a few gone by, such as the witch hazel, many of the crocus, and the daphne mzerum. I've been uncovering gardens and weeding. Not a lot of time for inside crafting. I have made some false starts at refashioning some clothes. Hopefully will finish at least one this afternoon!

Now the flowers (I wrote the descriptions underneath the pics):


Photobucket
Still a few crocus left shown here with frost:


Photobucket
Lots of Bloodroot, a native wildflower, everywhere. I love it!


Photobucket
Then there is the double Bloodroot. Only one little clump so far. I hope it spreads like the other.


Photobucket
This is a bulb, Chionodoxa. Glory of the snow. It is everywhere too, a beautiful blue.


Photobucket
These miniature daffodil bulbs that I planted a couple of years ago have been a bit of a disappointment. Not very many blooms. But I noticed my regular daffs don't have many flower buds either this year.


Photobucket
And here is a cultivar of the wild Rue anenome. This one is double and pink.


Photobucket
I have just 2 left of my clump of early tulips. When dh dug up around the foundation to insulate, most the bulbs were lost.

Photobucket
And of course scilla with a hyacinth coming up in the middle.


Photobucket
Here is a hyacinth all the way up.

Photobucket
The Lenten roses are blooming.

Photobucket
Close up of the flower.

Photobucket
And my white one.

Photobucket
Last but not least, the Star Magnolia has burst into bloom. Some of the flowers are a little brown because we had two hard frosts since they opened.

TFL
Kathy

Saturday, March 31, 2012

I joined the refashion coop blog!

I've been wanting to do more with refashioning the clothes I have, or remaking thrifted ones rather than buying new. So I joined the refashion coop blog. The rule is that I have to post 1x/month at least, so that will help me to complete sewing projects so I can post about them. There are so many talented sewists there!
Check out my first post if you're interested in such things in which I refashion a blouse to wear to a job interview. While you are there look around!

TFL

Kathy

My post on refashion coop

Monday, March 19, 2012

Knitting, knitting knobbys, spool knitting, french knitting...

In January when I started this post, I'd had a very bad cold and been rattling around the house. Finished this shawl designed by Deb at FullCircleQuirk after not knitting for many years. In winter my mind turns to fiber arts.
Photobucket

I found myself thinking about the knitting knobby I had as a child. And wondering if any of my friend's or their children on our street would be interested in learning. First I had to see if I could do it myself. I don't have a knobby anymore but I found a cool one made from copper pipe on line HERE and totally copied it. Luckily all supplies were in the basement workshop. I did add a copper joiner piece to the top because I was to impatient to grind the pipe as smoothly as I should have. I love its kind of craftsman steampunk style.

Photobucket
Black yarn was handy and I remembered after a foot or so that I need a tie for a black cotton robe. The Lion brand chunky varigated yarn i got at a discount store and I'm going to make it as long as possible then decide what to do with it.
Photobucket

Then I went nuts and made more of them, one from a tin can and one from pens.
Photobucket

I can't find the blog where I saw the genius idea of using pens. You put 2 pony beads held with little elastics between each pen (an inch or more from the ends) with the ink part removed. I used el cheapo pens from the dollar store and they didn't have a top cap like the ones in the blog so I put an elastic on each so the yarn wouldn't slip off. You can add more pens or take some out, or even knit straight instead of in a circle. If anyone knows the blog I'd be happy to credit the person. The tin can one has bent paper clips. I bent the small part of large paperclips down and used 2 pliers to bend the large ends. Then I taped them evenly spaced around the tin can. BTW, I have one of those can openers that leaves an edge that isn't sharp. Here are close ups of how the "knitting" is turning out.
Photobucket
The Pens you are looking at the inside. Its turning out similar to the tin can. Almost like I dropped all of the pearl stitches in a ribbing stitch. I kind of like it.
Photobucket
I also bought this little child's singer knitting machine for a dollar at a thrift store. Its missing the tension control, but I just wrapped the yarn around the top of a chair. Luckily the directions came with it. The soft green acrylic yarn works better than the wool knitting worsted.
Photobucket
Photobucket
Here is the reject, but it made me realize that by dropping stitches, or turning around on my other spool knitters, I can create spaces for thumbs or whatever.
Photobucket

I'm imagining making Franken-gloves. Fingers are almost never long enough for me. But now its in the 70s F, and who needs gloves!

Hopefully I'll teach my friends 3 little girls soon and will be able to report on that.

I'm linking up to The Thrifty Groove Thrifty Things Friday. AND Twig Studios Sunday Showoff! Check out the cool things in both places!

Kathy

Friday, January 20, 2012

More mushrooms

Here is what I did with the mushroom blanks I had left. (I ran out of white paint, so didn't finish off all my mushrooms for the craft show and gifts.) when I finally picked up my room after Christmas, I didn't want to pack them away as is so finished them off.

Photobucket

Photobucket

I like how they look on my woman cave/sewing room "mantle" (a marble topped bureau from dh's mothers family that I keep bed linens in.)

Photobucket

Hopefully will be over a terrible cold soon, so I have time for creating!

Kathy