Monday, December 28, 2009

Ruby Tuesday

I thought I would participate for the first time in Ruby Tuesday over at Work of the Poet. Check out the other Ruby Tuesday posts too!

I couldn't find my pic of my second batch of hand cream in jars with red covers, but I did make another batch.
So here is my Zorro inside the red interiored shelf. Everything looks better inside a shelf with a red interior or other warm color, as you can see from Zorro!
Zorro in kitchen cupboard

And here are two (the red ones) of a bunch of large ornaments that I made with my friend Sarah to put on the porch for winter cheer. They are about a foot across, and there are some much bigger, but not red. I never knew until I tried to decorate it how windy the front porch is in December! Everything got all tangled into a big mess! Maybe next year i'll figure out a way...

Photobucket

Photobucket

Thanks for looking - I was feeling sad that no one saw them.
Kathy

Thursday, December 24, 2009

Merry Merry Vintage Thingys Christmas!

I haven't been around much for a variety of reasons but i wanted to post once more before Christmas with Coloradolady/Suzanne. Check out her blog to see the other Vintage Thingies!

I posted the Christmas Gnomes/Elves that my mom FINALLY gave me from my childhood a few weeks ago. Here are a few other vintage ornaments from my tree. The old Christmas balls I got a decade ago at a yard sale and also have the same in pink, but chose not to do pink this year.

Photobucket

Photobucket

Photobucket

Here are two ornaments that we found when family went through my dear mil's belongings after her death a year and a half ago. My dh remembers them from his childhood.

Photobucket

Photobucket

And here is a funny elf in a sleigh, he is the same as the elves in the ornaments that I posted before from my childhood except in a sleigh instead of a kind of wire and mesh bower. His pine cone is missing tho so I have him sitting on a hazelnut until I find the right sized pine cone.

Photobucket

Merry Christmas everyone!

Kathy

Thursday, December 3, 2009

Face cups and Clowns for Vintage Thingies Thursday

I found these cute face cups in different yard sales/junk stores within several months of eachother 30 years ago. They were vintage then. I've never seen any since! The cute animal clowns I got at a yard sale this summer. The blue teapot in the background is also vintage, I think from the 1930s.

Photobucket

Visit Colorado Lady to see all the other Vintage Thingies!


Kathy

Friday, November 20, 2009

Finished for Friday

This is the first time that I've participated in Lit & Laundry's Finished for Friday. Be sure to check out the other posts at her blog!

I decorated some little baby food bottles and made some hand cream to give to some of my friends and relatives. Here's a pic. Yipee, I actually finished something. And gave 2 away already last night.

I decided to put a pic of my great grandmother Annedia on each bottle and also some flowers and/or butterflies.

Home made hand cream gifts

Kathy

Wednesday, November 18, 2009

Vintage Christmas Gnome Ornaments - VTT Post!

I thought i would do my Vintage Thingies Thursday post early this week. Visit Coloradolady to see all the others!
Here are some Gnome ornaments that my family used to hang on our Christmas tree during my childhood in the fifties and sixties.

Photobucket

My brother and I were totally enchanted by them when we were kids. Each gnome is sitting in a little bower which has 4 metal legs like a little stool on the bottom. Four of them are holding paper instruments and one a song book. Their arms and legs are pipe cleaners, their faces plastic, their bodies looked like a covered bead to me then I squeezed one and realized they are hollow thin plastic spheres covered with flock or thin felt. Each one is sitting on a tiny pine cone, in my memory, I thought their bodies were made out of pine cones, but no.
We've been after Mom to give them to us for years. I just found them in her Christmas closet yesterday and she agreed that we could have them. Not sure how we'll divide them up.

I'd like to make new ones.

If you are interested in making Garden plate flowers check out my tutorial, part 1 posted Sunday and part 2 this morning.

Kathy

Plate Flower Tutorial Part 2

Hi there!

When we left off we had two completed plate flowers ready to have hangers attached to the back so they can be put on stems in the garden. I made the glass flower to attach to the other side of a flat sided bottle that already has a plate flower on one side:

Photobucket

I put GE silicone II for windows and doors, clear around the edge of the bottle where it would contact the back plate of my new flower and some in the middle. Then I pushed the glass flower onto the bottle, centering it with the already attached one, and let it sit over night. The "stem" that I inserted into the mouth of the bottle is a metal stake coated with plastic. Some people put plastic or bubble wrap when they put metal against glass. As for the design, my thought was that a similar flower would look best. I'm not so sure now that I've done it, but here it is:

M

Photobucket

I think it needs some more bling in the form of beads etc. It is also very heavy, so I'm not sure I'll do 2 large flowers back to back again, unless the bottle has a large mouth and a bigger stake can be used.

Then there was the other plate flower:

For the back/attachment: I flattened a stainless steel spoon and bent the handle backwards. Then I attached the flattened spoon to the back of the plate flower using Plumbers goop. I personally trust Plumbers goop more for glass to metal. The silicone is great for glass to glass or ceramic.

UPDATE: August 2010: I think automotive goop is better than plumbers in terms of wide temperature variations and that's what I used on the plant labels. But I've also started using ge silicone ii (for windows and doors, clear) on the spoon backings. I'm doing this because I now have a bunch of metal adhered to glass with it in my garden that has survived another winter and very hot summer.

M

I have flower height 1/2 inch electrical conduit in the garden pounded in over a 10 or 12 inch piece of rebar with other plate flowers. Both the conduit and rebar can be cut to length with a recipricating saw. Here is the back so you can see how the spoon handle goes in.

M

And here it is from the front, in the garden. Almost everything is dead except the grass. So its nice to see some color!

M

Carmen/Gardencraze at GJunk came up with the spoon idea, and dcarch took it to new heights by cutting it to look like a leaf, and by doing the same thing with forks, bending them into beautiful objects. You can search for their posts on the Garden Junk Forum if you are interested.

Here are 2 more variations: a plate flower in winter. Lately they have been gorgeous with frost on them, but I don't have the skill or the camera to capture it.

M

And here is a nodding plate flower. You can see the pipe fittings that I used to use. I am changing because after a year outside the fittings separated from the plate. If/when I do this one over, I think I'll use a spoon or a fork hanger. The sun was reflecting off it and I had trouble getting a clear pic.

M

Finally dcarch at Garden Web on the Garden Junk Forum has done some amazing backings. I've not tried to to these but someone reading might have the skills.

A spoon cut with a dremel and the electrical conduit stem cut for leaves.

Spoon backing by dcarch from garden web

Two forks bent by heating and soldered together

Double Fork backing by dcarch from garden web

Another pretty fork:

Bent for backing by dcarch from garden web


So that's it!
Please let me know if I need to go into more (or less) detail about any part of this. I've never written a tute before. Also let me know if you make any plate flowers, I'd really love to hear AND see pictures!

Y si quisiera instruciones en español, dime, y preguntaré a mi profesor a aydarme.

Have fun!

Kathy

Sunday, November 15, 2009

Plate flower Tutorial, part 1

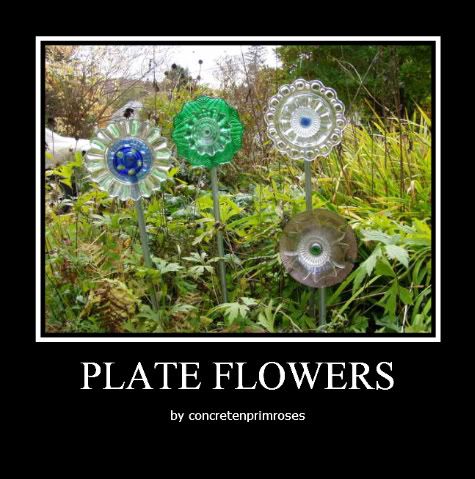
Several people have asked for a plate flower tutorial. The process takes a couple of days because adhesive needs to cure, so today we'll make the plate flowers. Tomorrow I'll attach the hangers, and Tuesday Wednesday after I put them in the garden, I'll post about hanger choices and show the final steps.

I owe everything I know about making these to the wonderful people at the Garden Junk forum at Garden Web.

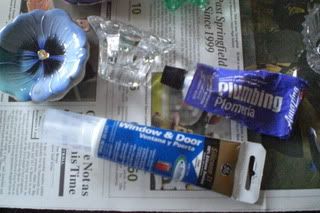
The first step is to get some dishes. I favor clear and colored glass because they sparkle in the sun, but I'll make an opaque and ceramic one today too.

M

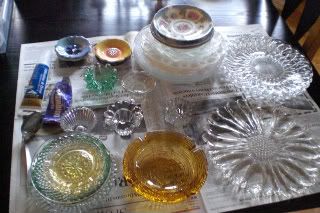
A rule of thumb, is 1 dinner plate, 1 small plate or bowl, and 1 center/candle votive or salt cellar. I buy what I call "daffodil" votives when ever I see them for less than $1 (I prefer 50 cents or less).

Photobucket

For adhesives GE silicone II for Windows & Doors, Clear. And I'm going to use Plumbers goop on a metal holder. Check the date before you buy! Sometimes it goes bad. There are some people who drill holes in the center with a ceramic/diamond bit. This tute is for the silicone method. Keep a rag or paper towel to wipe silicone off your hands but try not to get it on them.

Photobucket

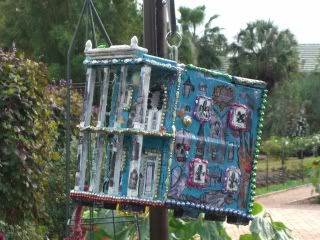
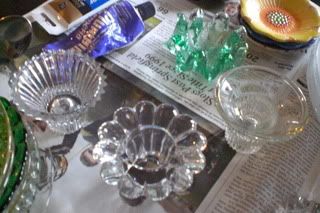
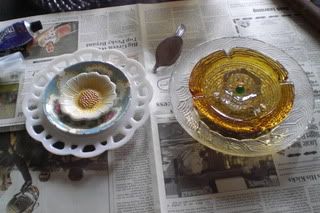
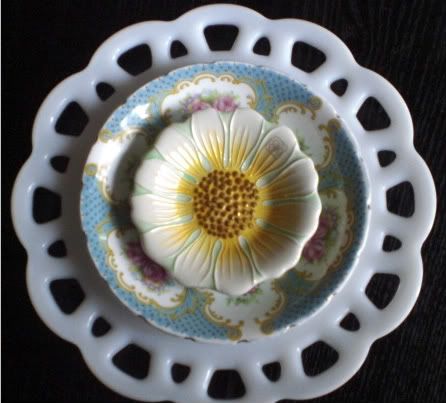
Then once you have the materials: protect your surface, work where you have ventilation, and begin to pile up plates and votives to find a look that is pleasing to you. I had made a flower about a week ago to test a new idea I had of attaching the flower to a flat sided bottle which would go onto the "stem". Since it was experimental I didn't use my favorite plates. A cool thing about this method is another flower can go on the other side of the bottle. So I decided to create a similar flower for the other side today. I also decided to use some opaque and ceramic dishes because I know my vintage-loving friends are interested in using that sort. Here is what I came up with.

Photobucket

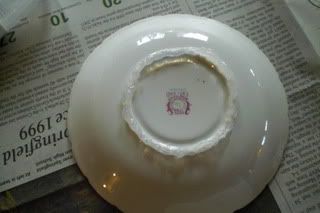
Gluing: Lay the largest (back) plate in front of you. Take the next plate or bowl and put it on the largest plate where it will go. Notice where the medium plate contacts the larger plate, this is where you want the ge silicone to go. You see here my medium plate has a rim on the bottom. I put ge silicone along that whole rim, being careful not to leave any gaps for moisture to get in. GE silicone ii for windows and doors dries slightly opaque which bothers some people, but it last through NH winters!

Photobucket

Then carefully place the siliconed plate in the center of the big plate, pushing in gently until the plates are in contact. Next test the little center plate on the medium plate which is now glued to the big plate. Its four little feet fit inside the indent on the medium plate which is good, but I need to fill in the gaps between the feet, as you see here. I put lots of silicone in between the little feet, up to their level, and less on the feet themselves.

Photobucket

Press it gently and firmly into the center of the medium plate. Now it has to set up. It doesn't take long to start to firm up, but should be left for the day to ensure total curing. But if it doesn't begin to set up within 10 minutes, your silicone is bad and you should return it.

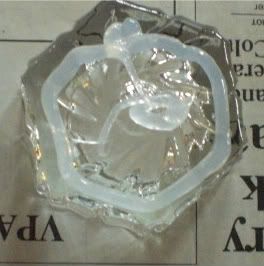
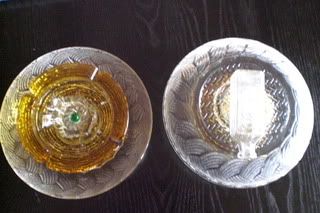
Now same process with the glass plate. I used some extra silicone in the center of the gold ashtry because it is so heavy. The center piece here was flat, but I still want a solid seal, so I show a pic below of how I did the silicone. I put a green marble in the very center because there was a rounded gap. If it had been flat I may have glued a glass glob.

Photobucket

Here they are. The glass one I'm showing with the back of the one I made last week, you can see the flat sided bottle that I am going to attach it to.

Photobucket

Photobucket

Now they both have to sit. I'll post the final steps on Tuesday when I put them in the garden!

If you want to look at more plate flowers, here is a link to search results at Garden Web's Garden Junk forum for "plate flower". Scroll down to see the threads.

See you Tuesday!

Kathy

Thursday, November 12, 2009

Vintage Thingys Thursday

Since I've been sewing lately, I decided to post some of my vintage sewing and fiber craft vintage items.
This pic includes a potholder that I embroidered when I was a little girl. I still remember how thrilled I was!

Vintage sewing and crocheting

And this is the Sewing basket that my Pepere gave my Memere for their 1st wedding anniversary 1927. I also have my Memere's (grandmother's) ham and sleeve presser and other small things.

1st Wedding Ann. Gift from Ernest to Augustine Couture

I've been getting ready to make Christmas presents lately. On Sunday I'll post a plate flower how to!

Visit Coloradolady to see all the other Vintage Thingy Thursday posts!


Kathy

Sunday, November 8, 2009

Inspiration Organization

Lots of us save photos or descriptions of things that we would like to do someday. I tried keeping them in notebooks or folders, and I never looked at them again. So I am going to share what works for me. We are all different so I don't know if it will work for you, but I now regularly look at my inspiration pieces and more important find what I'm looking for. I have a place to keep them all.

I saw these cool photo albums on sale. The kind with clear plastic slots to slide your pics into. And I bought them even though I don't use that type for photos and I had no plan for them. (They were such a good deal,lol)

Photobucket

Then one day I wanted a place to put articles or pics from magazines or things that I printed on the internet and I grabbed the big album. It perfectly holds 8.5x11 folded in quarters. And quite a few folded pages fit in each slot. I try to fold it so what it is shows throught the plastic. If not I write what it is on the article where it shows. Recently I began the little one as a sewing inspiration to keep in the same room as my sewing machine. A plus is even tiny things don't get lost and I can quickly look at 8 in the big album and 4 in the small at once.

Photobucket

What works for you?

Kathy

Thursday, November 5, 2009

Vintage Thingys Thursday

I've been sewing each day and finished my curtain but not my dress.

I decided to post some of my old family pics for VTT. First photo: My grandmother and a cousin in a birch bark frame. My grandfather and his cousin, cabinet photo. (He is on the right!)

Smaller

Second: My dh's great grandfather as a boy, then great grandmother and he in a nice paired frame.

For web page

Third: What I have done with copies of some of my old photos. I call them ancestor worship candle holders. Dh's family on the right one and mine on the left.

Smaller

Check out everyone's VTT posts at Colorado lady! I'm still learning so I apologize if my link to her blog isn't hot.

Thursday, October 29, 2009

Vintage thingys Thurday at Coloradolady

This is a post in response to Coloradolady's call for vintage postings.
She is here:
http://coloradolady.blogspot.com/2009/10/vintage-thingies-thursday-1948-vintage.html?

My Memere gave me these 8 great paper mache pumpkins years ago.  They were used as decorations when her children, my mom and her sisters, were young.And they actually burned candles in them!   I love them!  The second pic shows one of them on display with my dh's pine cabin from his boy hood.  You burn pine incense by putting it on the chimney.

halloween antique

Smaller

Use What I Have Challenge

I challenged my fellow crafters at the Garden Junk site to use what they have.  I am trying to do this because goodness knows I have a lot.  I hate to throw anything away that is useful.  Fortunately I can feel good about giving things to non profit thrift stores.  But what about all my material, supplies, wall paper, scrapbook paper etc etc. And so many things that the TS is not interested in.  I am going to try to use a lot of it up this holiday season!

Sewing repair

OK so I fixed my old flannel bathrobe which had a huge tear.  Not as creative as making a new one, but much easier and also meets my Use What I Have challenge to myself.  Later today I will finally sew the piece of fabric I've had hanging in front of a closet for a year into a real curtain.  That's the plan, a bit dull, but I'm sticking to it!

Tuesday, October 27, 2009

Today I made a plate flower

It has a new style backing which is a flatsided glass bottle.  We'll see how it holds up!
kathy

Plate flower with glass bottle back

Saturday, October 24, 2009

More flowers!

I made 4 more bouquets.  I picked up the arrangement from the museum to day and raided it!  With it and left over flowers that we didn't use I made 3 for the building that I manage.  We had a leak in the roof and the tenants who were affected adversely were so nice about it, I'm giving 2 for them and putting one in the conference room that they mostly use..  Plus I made a bouquet with yellow roses for my dfosterd.  and I'm going to get myself a pretty orchid at the florist Monday cuz now I want one too!

Wednesday, October 21, 2009

Made a beautiful bouquet

A nearby museum is having the local garden clubs set bouquets in front of art for a special show and fundraiser for the museum.  We did a bouquet by committee.  One of us picked out the art that would be our inspiration,  I bought the flowers, and another club member came over my house and put the bouquet together.  We ended up choosing a vase belonging to person number 1.  Early tomorrow morning I bring it to the museum, and I'll take a pic of the bouqueton its pedestal in front of the art (beautiful middle eastern tiles that used to be the back of a fountain) and post it here.  So that's what I've been doing creative for the past two days!

Monday, October 19, 2009

Halloween porch flowers

Repaired them and put them out.  The tall eyeballyhock is new.  The others were part of a costume last year.

Halloween

See more at my post at Garden Junk:

http://forums2.gardenweb.com/forums/load/junk/msg1014000727624.html

Sunday, October 18, 2009

Why not NOW!

Many people don't have the luxury of working part time and not having children at home. My only other things in addition to work are a certain amount of shopping, housework, home maintenance and to take my mom (who lives in another town) grocery shopping and on errands. Dispite this apparent huge amount of spare time, I find it difficult to motivate myself to do creative projects, gardening, studying spanish, and exercising. So to the ideas of 10 min per day & use what I already have, I am adding Why Not Now? Oh, also visiting friends or going to fun things that are up to an hour away. Why not now?
Why Not?

I blew it!

Yesterday I intended to repair my home made halloween decorations and put them on the porch which I cleaned off in preparation. Porch is clean, had friends over for dinner which was very nice, but spent the time with the 10 min cooking and, earlier, studying spanish.
Today I will do at least 10 min of halloween decoration. Why not right now?

Friday, October 16, 2009

Finished Teeger memorial

Finished last night, set out in garden today (attached to base, had to wait until temperature got above 40F.
It has a solar light in the top. I'm eager to see it shine.

Teeger Memorial near his grave

Thursday, October 15, 2009

Worked on memorial crystal tower/totem/solar light

Today I worked on getting my memorial to Teeger into the garden. I set the base and was going to attach the rest to it. Then I remembered that I had to attach the solar light. Problem! The top light globe won't fit over the solar fixture and rest on the vase like I planned. So I had to add another piece that allows the globe to sit a bit higher.
Tomorrow when it has dried overnite I'll finish and then take pics of it in the garden. As long as its above 40 degrees F. That's my 10 minutes today!

Wednesday, October 14, 2009

Use what I have, yesterday and today's plan

I posted a challenge over at Garden Junk (conversations side) for pack rats like me to use what we have, rather than buying new stuff, for one month.
Yesterday I began a glass totem to put near Teeger's grave. I plan to have a solar light in the top of it. I didn't have the right color glass globs to decorate it (I wanted orange like his eyes) but remember that I HAVE glass beads. So I used them.
Today I will work more on it and possibly finish it. I can use a solar light that I already have, by stealing it from the garden.

Monday, October 12, 2009

Use what I have and report on yesterday

Yesterday I took the suggestion of someone in the GW Crafts and Decorations forum and put my old spools of thread that are too old and break in the machine in jars in my sewing area.  I added a couple other things like a very old 6 inch ruler and an old measuring tape.

Today, after doing some craft clean up in my house, I am resolving to use what I have and not buying anything unless it is something small needed to finish a project  for the period of one month.  What I have been doing is buying more stuff at a faster rate than I can use it and getting rid of the older things to make room.

Pretty silly!

Sunday, October 11, 2009

Yesterday bowling ball, today decorate sewing room

Yesterday my friend Sarah and I began to decorate our bowling balls.  I don't know about me and mosaicing, we'll see.  Sarah's is unlike anything I've ever seen.  But she's more artsy and I'm more crafty.
Today I'm making the upstairs living room (really an enlarged hall way that the bedrooms and bath room open onto, nicer for sewing and crafting.  I'm putting my old thread on wood spools into jars etc.  My goal is to get my stuff off the dining room table, lol.
What are you doing?

I'm still working on getting the comments embedded. 

Saturday, October 10, 2009

Mosaic bowling ball, and trying to get embedded comments!

I am trying to get comments embedded under the post, but there is some glitch apparently in blogger.  That way if/when anyone else reports on what they have done it will just be there, not hidden away.
Today I am going to help my mom, and a friend in the same town and I are going to begin to mosaic our bowling balls!

Friday, October 9, 2009

Buried Teeger today, Finished garden fairies yesterday

The two paper garden fairies that I made are pictured on the right.  They were inspired by some witches in Somerset Studio magazine.  Copied really.  If you'd like to see a larger pic, I posted in Garden Web Craft & Decoration Forum

http://ths.gardenweb.com/forums/load/crafts/msg1008305711510.html

Today, I don't know.  Maybe something for Teeger's grave.

Thursday, October 8, 2009

Thursday, October 8

Last nite I finished one Halloween fairy, and this morning I started another.  I'll post a pic here when both are done.  Will probably post it at GW crafts and decorations forum as well.

Wednesday, October 7, 2009

Wed: Halloween paper doll. What about you?

I'm determined to finish this Halloween paper doll.  Its pouring  so can't do anything outside (like concrete mushroom caps, or even buy the concrete.)  I'm going to stay home for a while if I can avoid work because my Teeger, who has a congenital liver defect, is dying.

Here he is in April.  His eyes are pretty orange cuz his liver doesn't filter out the copper in his blood.


Teeger in April '09

Tuesday, October 6, 2009

Tuesday October 6 What are you doing?

I am at work, but will post later what I have done with my 10 minutes.  I want to photo graph my dress and post it at burdastyle.  And I want to reassemble my concrete filled plastic birdbath in preparation for mosaic.

Monday, October 5, 2009

Monday's 10 minutes!

I'm still traveling.  In the airport in Toronto waiting to fly to Boston, then 2 hr drive home.  But I'll do something creative today for at least 10 minutes when I get home and report here.
Micki sorry about your back, hope you are better!

Sunday, October 4, 2009

Use the 10 minutes however you want and I'm still in Toronto

Some people are cleaning up and doing yard work with their 10 minutes (or more as it may work out!).  I think that is fine.  What ever you need inspiration for is ok

Today I am still away from home in Toronto.  I bought some fabric since I don't live in a big city and don't get the choices that are here generally.  After choosing some likely patterns at burda style.  My ususal problem is that I love to shop but don't follow through on making stuff (including garden junk).  So what I am going to do today and !tomorrow is decide for sure what I am going to make with at least one of the fabrics, and then start it when I get home.  I don't have to sew what ever it is every day, can do other creative things if I want, but maybe I'll say I have to sew once a week until this project at least is complete.


.

Friday, October 2, 2009

10 min away from home?

I am in Toronto for a wedding.  I didn't bring anything with me in terms of creative work.  Not sure what I will do!  I guess I could design or plan something.  Or research.  I'll report later. What are you doing!

Wednesday, September 30, 2009

Halloween is coming!

Here are some Halloween plate flowers that I made last year.  Need to dig them out and decorate soon!


And another:

PhotobucketHalloween hostess gift

The one in the garden I gave as a hostess gift at a Halloween party last year.  I just love those fake leaves with the Halloween plate flowers.  Too bad they fade.

Next week maybe I'll get out the eyeballs and make something else.

What are you doing for your 10 min?

Please report on your 10 minutes for today, (or yesterday if you like), by commenting here.  I will comment tonite or tomorrow when I've done something.

Tuesday, September 29, 2009

What "counts" toward my 10 minutes

The obvious answer is whatever I say does.  But I've been wondering if all this sewing to make a dress by the time I need it later this week really is in the spirit of my original plan.  I've decided that it is for 2 related reasons.  The first is that I was inspired to make it by the good time I had making my simple lined curtains for the living room which I began as a 10 each day project.  The second is that I am learning so much because it is such a complicated pattern which I made more so by my fabric choice.  I egg myself on with 10 minute promises.  I can make sample practice button holes for 10 minutes, for example.  .Without the 10 minute plan I think that in the unlikely event that I would try to do this, I very likely would have given up by now. 
So sewing again today!

Monday, September 28, 2009

More sewing for me. What are you up to?

Today I plan to sew more.  This 10 minutes routine convinced me that I know how, lol.  Just this morning I realized that since the sleeves are shear I should do french seams which I've never done before.  If I'm to finish the dress by Thursday it will take a lot more than 10 min a day.  Luckily the other thing that motivates me is short deadlines, lol.   Next week after the wedding  I'll be back to other projects, thank goodness. 

Sunday, September 27, 2009

Today's plan

Its raining here so I'm released from fall outdoor chores and plan to sew, for at least 10 minutes. What are you doing?
I will also try to figure out how to have the comments show without being clicked on.

Saturday, September 26, 2009

What did you do?

Inviting friends to post by commenting here! Later once I've done something, I'll also post in comments.

Friday, September 25, 2009

Concrete and sewing

Yesterday eve I scratched some lines into the mushroom stems that I made on Sunday. That only took a couple of minutes but was very satisfying. Maybe this weekend I'll make some caps to go with.
Sewing: What was I thinking to get plaid fabric for a dress pattern not recommended for plaids! I don't even like plaid. And my sewing skills are not that great. So this morning before work I basted up one side of the skirt to make sure that I really did match them ok. Seems to be fairly well matched. Phew.

Thursday, September 24, 2009

Today: Sewing

Today I cut the skirt part of the pattern for a dress I am making. Its complicated because its buffalo plaid light weight taffeta with matching and had to cut in one layer. Tomorrow I plan to finish cutting the basic pieces.

Getting started with 10 minutes per day.

I decided a week or so ago that I had to spend at least 10 min per day furthering a creative project.
I had fallen into a funk. And I got an idea from another part of my life.
When I started saving money years ago I read a fantastic book called: "How to get what you want in life with the money you already have." In it you are instructed to carefully figure out how much you can save every month then ... (turn the page) cut that amount in half and that is what you commit to save! I usually saved more but I knew I only had to save the small amount and for some reason that was very freeing. And during a tough month, I knew I only had to save the small amount. Soo I tried it with my time commitment - Only 10 min. Since then I have completed sewing some new lined curtains for the living room (had the material for months) and broken and shaken 7 dishes for mosaic, made some concrete objects and started to make a new dress. The other part of the rule was that although in my case cooking and gardening don't count toward the 10 min, I give myself permission to feel very good about only doing 10 minutes particularly if I've done something big in one of those 2 areas.
I'm excited about projects again although still feeling a bit sad at times.
Funny how our brains work. Taking the first step is so important.
I am starting this blog to write my daily progress and encourage my friends (and anyone else) in a similar quandry to post how they have spent their 10 minutes. I hope we can support and encourage and learn from eachother!