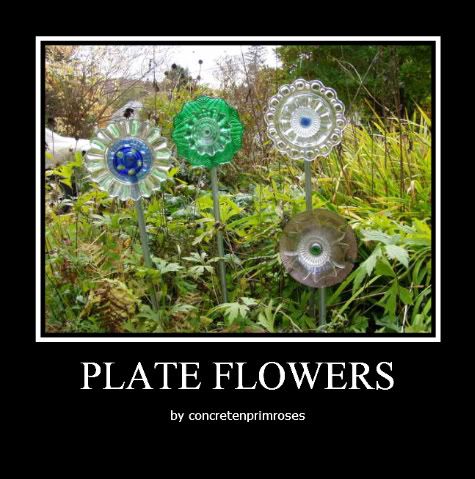
When we left off we had two completed plate flowers ready to have hangers attached to the back so they can be put on stems in the garden. I made the glass flower to attach to the other side of a flat sided bottle that already has a plate flower on one side:

I put GE silicone II for windows and doors, clear around the edge of the bottle where it would contact the back plate of my new flower and some in the middle. Then I pushed the glass flower onto the bottle, centering it with the already attached one, and let it sit over night. The "stem" that I inserted into the mouth of the bottle is a metal stake coated with plastic. Some people put plastic or bubble wrap when they put metal against glass. As for the design, my thought was that a similar flower would look best. I'm not so sure now that I've done it, but here it is:


I think it needs some more bling in the form of beads etc. It is also very heavy, so I'm not sure I'll do 2 large flowers back to back again, unless the bottle has a large mouth and a bigger stake can be used.
Then there was the other plate flower:
For the back/attachment: I flattened a stainless steel spoon and bent the handle backwards. Then I attached the flattened spoon to the back of the plate flower using Plumbers goop. I personally trust Plumbers goop more for glass to metal. The silicone is great for glass to glass or ceramic.
UPDATE: August 2010: I think automotive goop is better than plumbers in terms of wide temperature variations and that's what I used on the plant labels. But I've also started using ge silicone ii (for windows and doors, clear) on the spoon backings. I'm doing this because I now have a bunch of metal adhered to glass with it in my garden that has survived another winter and very hot summer.

I have flower height 1/2 inch electrical conduit in the garden pounded in over a 10 or 12 inch piece of rebar with other plate flowers. Both the conduit and rebar can be cut to length with a recipricating saw. Here is the back so you can see how the spoon handle goes in.

And here it is from the front, in the garden. Almost everything is dead except the grass. So its nice to see some color!

Carmen/Gardencraze at GJunk came up with the spoon idea, and dcarch took it to new heights by cutting it to look like a leaf, and by doing the same thing with forks, bending them into beautiful objects. You can search for their posts on the Garden Junk Forum if you are interested.
Here are 2 more variations: a plate flower in winter. Lately they have been gorgeous with frost on them, but I don't have the skill or the camera to capture it.

And here is a nodding plate flower. You can see the pipe fittings that I used to use. I am changing because after a year outside the fittings separated from the plate. If/when I do this one over, I think I'll use a spoon or a fork hanger. The sun was reflecting off it and I had trouble getting a clear pic.

Finally dcarch at Garden Web on the Garden Junk Forum has done some amazing backings. I've not tried to to these but someone reading might have the skills.
A spoon cut with a dremel and the electrical conduit stem cut for leaves.

Two forks bent by heating and soldered together

Another pretty fork:

So that's it!
Please let me know if I need to go into more (or less) detail about any part of this. I've never written a tute before. Also let me know if you make any plate flowers, I'd really love to hear AND see pictures!
Y si quisiera instruciones en español, dime, y preguntaré a mi profesor a aydarme.
Have fun!
Kathy


Thank you so much for the tutorials...I plan to make some this winter for the spring, now I can have my plates in my flower garden to enjoy too!! I am loving this idea, and will show you when I have some made!
ReplyDeleteIs it hard to solder these forks? I love everything -- but I'm not sure about the soldering. Can you recommend a place on the web that I can go for instructins? I would also love for you to post these on Wednesday at the Boardwalk Bragfest. I had been so looking forward to learning how to make these as I'm sure others have as well. I absolutely wish it were spring so that I could start planning my glass garden. It is going to be so beautiful. But at least now I have time to collect the glass.
ReplyDeleteI love these and am going to try some this summer.
ReplyDeleteWow I have seen the two plate flower attachments but not the last two with the fancy fork/conduit done. That is amazing. It looks pretty hard to do!
ReplyDeleteI haven't made anymore plate flowers since the ones we did last summer. They are still "blooming" where I stuck them(-: I really enjoy seeing them when I look out the window(-:
Thank you for sharing how to do this. It's a great tutorial! And, your work is beautiful!
ReplyDeleteThese are beautiful! Thanks for sharing the instructions. How do you flatten the spoons? I tried using a hammer with the spoon between cloth on a block of wood with no success. Suggestions?
ReplyDeleteFirst I only use spoons that I can bend the handle at least slightly with my hands (the part up by the spoon bowl part). The I use a small sledge hammer on a small "anvil" because my husband has those things and it makes it easier. This anvil is part of a large clamp which I mention in case anyone reading this may have one and not realize it. You need something less yielding that wood. This is definitely the hardest part. Another idea is to use something already flat like cake servers or spatulas. Good luck.
ReplyDeleteI LOVE YOUR FLOWERS! AND PLAN TO MAKE A FEW FOE MYSELF !! YOU DID A GREAT JOB OF LETTING EVERYONE KNOW HOW TO MAKE THEM!!!
ReplyDelete