I'm linking to Lit & Laundry's Finished for Friday again. There are more cool projects there since yesterday, have a look!
Today I will tell you about the letters and variations and alternatives that I have considered. See yesterday’s post for how to make and install the sign and post.
First I am going to tell you what I did, then I’ll mention a few other options. I'm considering yet another post on other label ideas, cuz I did come up with quite a few on the road to making these. Seems a shame to waste all my research.
Don't be disappointed if you don't have the equipment to do exactly what I did, i suggest some other possibilities at the end of this tutorial.
Here is a closeup of one of the ones I made for the gardens at the local shelter:

For the common name, I cut vinyl letters on my Graftec Robo cutter from outdoor rated vinyl sticker material. If you have a Wishblade or a Cricut, or another cutting machine, you can do the same. They are mostly just under 1 inch tall. The whole word just under 4.5 inches long or less worked best. This particular one, Lilac, was such a short word that I made the letters a bit bigger. I believe you can buy vinyl letter stickers that are for outdoors at the hardware store if you can’t make your own. I doubt the scrapbooking kind would hold up, but don’t know really.
Look closely and you can see where I filled the screw holes.
To print the scientific name and some information about the plant, I used CLEAR Avery LASER labels (Not Inkjet! Inkjet quickly fades.) I have read that the laser labels last for years in the garden. I only had time to test it for 2 weeks in my garden, but we did have rain and snow! If you don’t have a laser printer, you can set your words up on the template in Word, then go to a copy shop and have them laser print your file onto the labels.
How to find the template and fill it out:The template was in Word under Tools/ Letters & Mailing/ Envelopes and Labels/ Choose labels, then go to Options select the template, which is the brand and size. What you should see is the set up for a whole page of labels that you can type in and save. Avery 5163 is what I used. The front of the package will have the template name. By the way my pack of 10 sheets of ten 2” x 4” labels cost about $11.00. Eleven cents each. Once you have the template you can type what ever you want into each spot. I left some space around all edges, and I printed on plain paper before using the labels to make sure it would fit right. I had to fiddle a bit and edit to get the words to fit well. I really had to fiddle to get 8 point blank lines at the top (and the bottom.) Notice that I do have room top bottom and sides. They may not print well if too close to the edges.
Applying the letters and stickers:I put the plate on my knees so that the elbow was between and applied the stickers. I'm amazed that I didn't accidentally apply any of them upside down. Just be careful to have the plate right side up facing you. As I've mentioned I had to wipe powdery paint residue off with a rag first. (I did them all at once before this stage.) In a couple of cases I had to spray paint lightly again. Once the stickers were in place, I smoothed the letters and labels firmly with my pampered chef plastic scraper.
Here they all are (I made 24 with words and 2 blanks):

Other possibilities:
* If you prefer, you can write directly on the sign with a paint pen. (Sharpie will not last!)
* My back up plan, if the letters or stickers get vandalized, is to use my cutting machine to cut a stencil and spay paint the info. I couldn’t be as detailed, but it would be more permanent.
*A purchased letter stencil could be used, especially for the large common name. Outline the letters in paint pen then fill in.
* I considered just cutting the post at a 45 degree angle and attaching the switch plate directly to it. But this has 2 problems: 1. how to pound it into the ground and 2. if the switch plate falls off there is a sharp spear like stick reinforced with rebar pointing upward. Yikes! I don't think so.
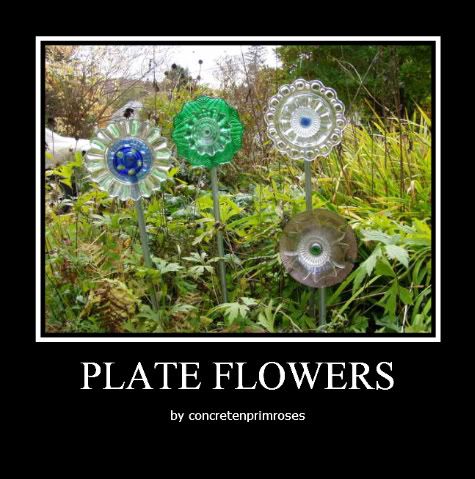
For my garden, I may use the spoon attachment method invented by Gardencraze/Carmen of the Gardenjunk forum for hanging plate flowers. Below is a pic. The handle of the flattened spoon slides into the pipe. Not all spoons flatten easily and some handles are too big for the pipe, so choose with care if you try this. Forks and cake servers also work. They would be very easily walked away with tho, so I wouldn't do this in a public area. A great thing about the spoon (or fork) method is that you can hang things on trellis, fences or other things.

This is a round metal switchplate. Neat looking but they cost $2.49 each and are not really any bigger than the oversized singles. In the back ground I put one I made with painted pvc pipe and written with a silver paint pen (no P. Denticulatas in the pic, by the way.) I also plan to experiment with plastic switch plates because you can get big ones. I don't think they will last the winter but you never know!
Good luck and have fun. Please let me know if you make some! I’d love to link to you or feature your results.
Kathy
PS I'm repeating my Disclaimer, and adding that I live in New Hampshire, Zone 4: This project is experimental in that I haven't tested it in my garden for a full years weather. I have experience making things that stay out in the garden all year and have used that knowledge to design these. But only time will really tell.


Hi Cathy
ReplyDeleteThanks for visiting my blog. I have enjoyed my visit to your lovely blog today. Your garden sign/labels are wonderful. It was so iteresting to hear how you made them. I have never worked with vinyl lettering but would love to give it a try. I love your mosaic too. I your '10 minutes a day' is a great idea.
Hope your are having a good weekend.
Best Wishes from England.
Lindsay
I was a wondering how you got the info on the label. I luv them!
ReplyDeleteHey Kathy- thanks so much for your detatiled help- i so so appreciate it. I went and lookd at the cheesecloth-but i would need so much of it-and i think tea stain might be dark- i was also thinking of some sort of wallpaper-or wrapping paper-Love the magnet idea- i pased down JoAnn asiles for 2 hours today- and got nothing to to ceiling- right now a portion is draped with a sheer material- it looks ok-but several customers came in yestrdy asking if it was a bridal store- funny-so not so sure about that- i hung light colored burlap up in one corner-but my husband said he didnt like it- so im still thinking-i ll have to see what paper i can find-
ReplyDeleteTRUST me i so appreciate it- as much as i love having my own place- after renting space- a lot more stressful-and a bit challenging with 3 kids at differ.schools-pick ups and so on-
I love to share the experience with you-
Karryann
Great idea and tutorial...I just label my plants with a permanant marker on a tongue depressor! I should be more creative.
ReplyDeleteYour labels look fantastic! I found you via the New England Bloggers. It is great to connect with more bloggers from NH.
ReplyDeleteMany thanks!
ReplyDelete